2nd Edition of the Kiwizone Stereo web site. These are the only pages so far loaded to the internet. 1st edition here
By John Wattie
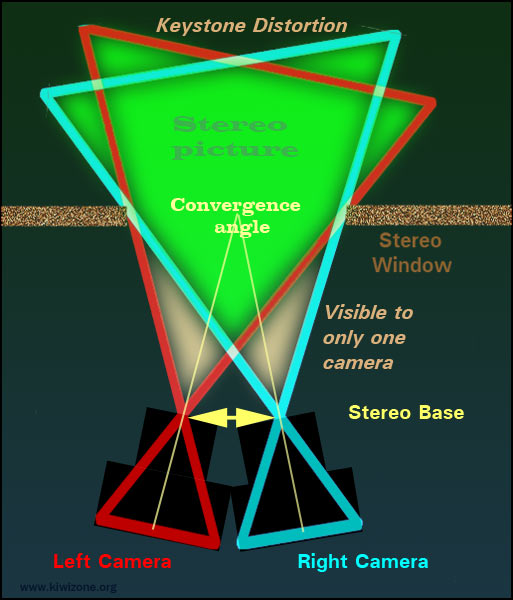
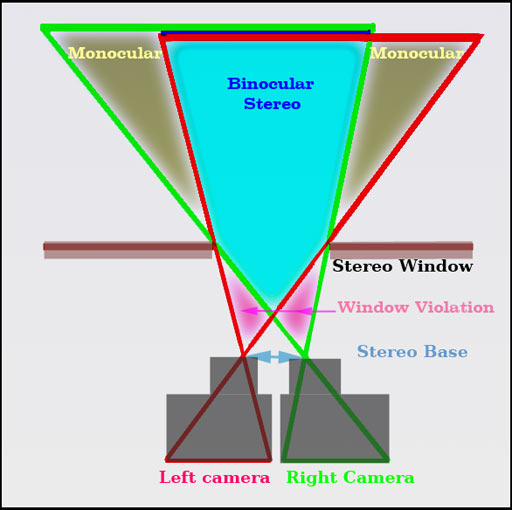
1. Toed-in optical axes.Both cameras tilt towards the same foreground object. Toe-in corrects for convergence at the time of taking the picture. This avoids a window violation (wv) because the cameras converge on the level of the stereo window. Objects can sit in front of the stereo window, without causing eye pain, if they avoid the areas marked as visible to only one camera in the above diagram. Otherwise you have a "window violation" (wv). Objects beyond the stereo window and seen by only one camera are in "monocular areas." These are inevitable and do not arouse protests in commentators, but it is better to keep all objects of interest out of monocular areas. Unfortunately, toe-in causes keystone distortion because objects are seen obliquely and parts closer to the camera are magnified more than parts further away. The magnification difference between the two sides of the pictures are exactly opposite to each other. The left camera magnifies the left edge but the right camera enlarges the right edge. The result is a pain in the eyes at the edges, because different sizes in the vertical direction makes the image pair difficult to fuse. Landscape aspect ratioModern 3D movies, computer screens and TV have a horizontal, rectangular shape, not the old square or portrait aspect ratio of earlier stereoscopic images. Toe-in keeps a landscape aspect ratio, because nothing needs to be cropped off the sides of the images during post processing. Toe-in angling of the cameras must occur around the front nodal point of the lenses, just as a panorama must rotate around that point. Otherwise the stereo base will be changed at the same time as the stereo window distance and we want to vary those two independently. Unfortunately, changing the focus also moves the nodal point, ending up with three things for obsessive cameramen to worry about. Hmm: how about going with parallel geometry? Beam splittersThese usually work with a toed-in axis. The latest Loreo 3D 9005 lens in a cap (beam splitter) for digital SLR cameras combines parallax compensation with focus, so that the focused object
always has ZPD (zero parallax displacement). However, it produces portrait format images, since they must both fit side by side in the 4:3 aspect ratio frame of an SLR. Stereo BaseThe distance between the cameras can be changed and the lenses zoomed while keeping the degree of toe-in constant. This maneuver follows the PePax principle (see later).
|
Keystone distortionPost processing is essential for toed-in images to correct for keystone distortion. The correction involves horizontal perspective adjustment on each image. The heights of objects at the edges of the image pair are restored to identical. In stereo movies, keystone correction is done frame by frame, but can be automatic (as in StereoPhotoMaker software: SPM). The correction is time consuming and many workers say it is better to shoot parallel. If the lenses have barrel distortion, it is necessary to correct that first in software. In Photoshop, perspective correction is a Transform function. For keystone distortion perspective correction is run horizontally, best done on both images, sharing half the correction between them (details later). Focus and stereo base (inter-ocular: inter-axial: separation ) are impossible to
fix properly in post processing and it makes sense to correct them in the camera. (Depth maps in post processing are not as easy as getting it right while taking the image!) Toed-in Movie Cameras Another assistant is the "focus puller" who keeps the two cameras focused on the main actor. In advanced rigs there may even be an "IO&C puller," also called "Con/IO" (Inter-Ocular and Convergence puller: two jobs one person) Disparity Tagger is a computer from Binocle which colour codes disparity live, during filming, and adjusts the camera stereo base to correct for out of range parallax. The parallax limit can be set for different screen sizes. Amateur stereoscopists must learn to do this without help from a fast computer! Even cameras working through a mirror box, which usually shoots parallel, may be optically toed in for convergence correction. Depth of fieldLarge movie cameras with full size sensors often aim to reduce depth of field as a tool to direct the eyes of the audience onto the active subject. Everything else goes out of focus. (Extensively used in Avatar) Low depth of field works well as a dramatic tool in a movie but fails badly in a still stereoscopic picture. The depth of field must be deep, because the audience for a static view like to explore all the depth planes in the image and are unhappy if there are blurred bits. Documentary movies in 3D are often made sharp all over because the audience will explore the scenery in unpredictable ways. Live 3D broadcast TVThis does not have the luxury of post processing, so camera corrections for alignment and convergence are preferred. There are many traps in live 3D TV sports broadcasting as described here |
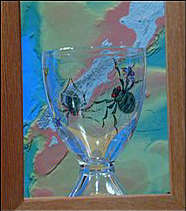
2. Parallel optical axes.This is the main stereo rig used by stereo photographers at present. Both cameras look straight ahead. The cameras are aimed at infinity objects. If the stereo pair are mounted like this, the stereo window is at infinity. Everything else lies in front of the window, which is a massive stereo window violation. Digital stereo cameras, with both channels looking straight ahead and parallel, may allow convergence correction in the camera by cropping off the insides of both images, reducing the horizontal width in the process. This is done while viewing the image, in stereo, on the back of the camera. (Fuji). The photographer must think, while taking the stereo pair using parallel cameras, that the inner parts of both pictures are going to be cropped off during convergence. Loss of wide aspect ratioThe aspect ratio is not preserved with a parallel rig and landscape format becomes square or even portrait format during post processing for "convergence" (HIT). The image height can also be reduced in post processing to regain a wide aspect ratio lost during convergence. This means the original picture must be over-framed to allow for all this cropping. Practical example showing how the stereo window was set on a macro subject, where image loss can be severe.
(see Waterman Polyhedra:
|
Convergence correctionParallel twin camera rigs that do not have parallax compensation built in must have the closest objects superimposed during post-processing, by HIT (Horizontal Image Translation) and cropping, until the desired stereo window is at the screen surface. This may be done by automatic batch processing of a whole folder of images. HIT is Horizontal Image Translation,HIT is often done manually, with the left and right images on separate layers, in an image processing program such as Photoshop (PS) or StereoPhotoMaker (SPM). The top image is made transparent, or blended as a difference image (PS), or converted to anaglyph (SPM). The images can both be seen simultaneously by either method. As the image pair came out of the cameras, the most distant objects are superimposed on themselves and nearest objects are widely separated. This is exactly how you do not want the stereo pair to be, because the stereo window is at infinity, behind everything, when it should be in front of everything. The images are moved relative to each other, in the horizontal or x axis (HIT), until the closest objects are superimposed on themselves. Getting nearest objects superimposed at the edges of the combined image is always the first step and floating windows, if they are to be used, are set up after that. Anaglyph is excellent for doing HIT because you can quickly see from the colours if a near object is not on the screen plane. Objects on the screen plane no longer have a coloured fringe to them. You can also quickly see if objects are rotated or not the same size or have keystone distortion (which shows up as different magnification on each side of the image). These defects are not always so obvious when the anaglyph is seen through the goggles, in stereo, by an experienced 3D viewer who has learned to correct such defects in his brain. It is always wise to check the anaglyph, without goggles, before declaring it is correctly aligned and converged. After HIT, the most distant objects are widely separated, which is the opposite of how they were after filming with parallel cameras. Correct Stereo Window
|
 |
 |
|
|
Often correction is also made at this stage for vertical misalignment, rotation, unequal size, perspective correction and colour correction.
Once all this is done, the images are ready for subsequent special effects (CGI, VFX) and floating windows.
Once the stereo pair is cropped down by cutting off redundant parts, you may limit subsequent choices in post processing, like floating windows and aspect ratio adjustment. It is often good to keep a set of aligned pairs which have not been converged or cropped. Cropping sets the stereo window. Setting the window by removing parts which are causing window violations may narrow a landscape aspect ratio towards a square or even portrait aspect ratio.
If the image height is cropped down to make the picture wider, remember that when the picture is resized to full screen or monitor height, this is equivalent to a digital zoom in (mild telephoto).
To allow for these sorts of changes, it is often wise to over-frame the stereo image. In other words do not always zoom to fill the frame while taking the picture. This move will leave extra picture space to allow aspect ratio changes and advanced window effects in post processing.
See later for through the window and differential window floating effects, for which the aligned images may need to be kept as full size separate files, and convergence only done as the desired effect is achieved. Batch processing for alignment is good but automatic convergence may mess up advanced window alignment later.
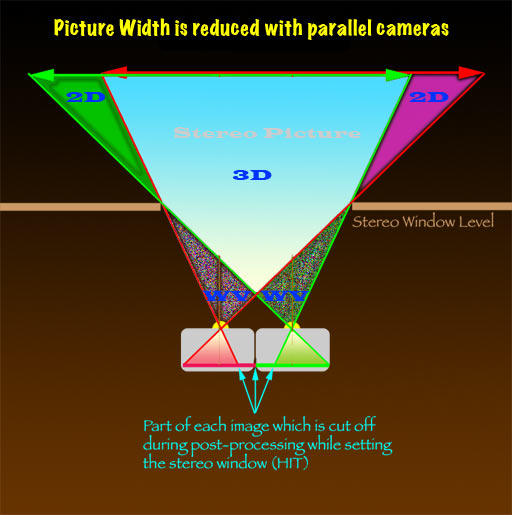
The closer the stereo window is to the parallel cameras,
the more image width is lost when the stereo window is set during post processing.
The image width is retained because
very little or nothing is cut off during post processing
3. Horizontal sensor shift.
Sensor shift is the best method for converging parallel camera stereo rigs. Variable sensor shift is HIT done in the camera and not during post processing. (Horizontal lens shift has a similar effect, but cannot be used, because that changes the stereo base.) Built in stereo windowDedicated film stereo cameras like the Stereo Realist used this method, by keeping the two image frames further apart than the lens separation. This was called "built in stereo window." The convergence was fine for objects 2 meters away, but could not be adjusted for other distances because it was not convenient to move the film gate when using roll film. Double depth slide mountsStereo Realist slides could have further window correction by using slide mounts with narrow apertures, aligned to cut off the inner parts of the image pairs. This is the same as digital HIT, described above, but was combined with reduced window separation to float the stereo window forwards. We will discuss the digital version of floating windows later.
|
Adjustable sensor shiftCurrently I can find no reference to any camera using adjustable sensor position, but I bet some clever manufacturer is working on it! Horizontal sensor shift in a digital stereo rig should be adjustable, so that convergence can be varied to suit the subject matter. Image stabilisation is done in some digital cameras by oversized sensor shift, using a linear motor. Variable convergence would use the same ability to move the sensor in relation to the camera optical axis. Because it changes both convergence and vertical alignment, image stabilisation
should be turned off for stereo work in case it becomes out of phase in the two cameras.) Vertical sensor shiftVertical shift of one image only is provided in stereo cameras, such as the
Fuji, in case one of the channels is slightly out of alignment with the other. Vertical shift of both images simultaneously will be discussed later under cameras with electronic alignment and convergence control. Window violation versus
|
Stereo Macro Photography with moving sensorsAs the sensors are moved out from the optical axes, the stereo window gets closer to the cameras. The lenses have to be racked out to keep the window in focus. When the distance from the lens to the sensor and to the stereo window are equal, magnification is 1:1.
|
Special Case:
|
![3D Movie Making [X stereo 1080p]](http://farm5.static.flickr.com/4011/4424028394_e26ed3e06c.jpg)
Karl Schodt describes how to
set up a cine mirror rig
4. Mirror or prism stereo rigsHalf silvered mirror rigs are commonly used for 3D movies, because professional movie cameras are too big to set up parallel, with a 65mm or less stereo base, any other way. Mirror rigs have problems with dust on the mirrors, light leaks, reflections, ghosting and a long time spent aligning the cameras before the shoot can begin. Less than half the light reaches each camera and very bright lighting is essential (which gets hot and liable to blow fuses.) Mirror rigs are very good for macro stereo. |
A host of different mirror rigs are so well reviewed by Superb high speed stereo insects and water figures, with discussion of the toed-in set-ups, which eventually evolved to front surfaced mirrors: John Hart mirror rig John built mirror rigs years ago for macro stereo. Jim Metcalf has assembled a mirror rig for macro photography and his Flickr site shows the results
|
5. Over-size sensors with |
Discussed on the next page. |
Introduction to mounting stereo cameras: Previous page.
Frans (fotoopa)
The picture frame now used for my in-flight insects stay at 100mm. I use a combination of Toe-in and Parallel setting. The current stereo base is about 32mm (is the minimum possible value). ( measured on the mirror position and AF105mm macro lens) At the focus point the 2 cameras have 15mm space, the rest (32-15=17mm) is the toe-in value. This give me a keystone error but if the background is black or blurred due the extra out-focus depth this keystone error can be disregarded. I have used this compromise to limit the extra crop of 32mm from the 100mm picture frame. On high-speed macro and with the current shutter lag of 58 msec most insects are too far out the centre or out the frame. Setting the 2 cameras for only Parallel, you lose extra 17 mm and this results again in missing the insects or you have to set the picture frame at 100+17= 117mm for the same results. But 117mm give for small insects less pixels due to the heavy crop. But reading now your articles, I believe that I will test the only Parallel method to see if the results in case of backgrounds are better (and put the picture frame for 120mm (after cropping due to the 32mm stereo base this give me the same netto picture without keystone effect) Setting the mirrors again take me 1/2 day but I believe it will give me a valuable test. Disadvantage is the lower resolution for smaller insects. Once the setup is adjusted I have to work with the setup for several days due to the time-consuming adjusting of cameras and mirrors. Once I have a setting, I can make an action in photoshop to normalize the 2 cameras to the same pixel density (D300 - D200) and to crop the correct picture due to the parallel camera setting. There is no need to due this in SPM because the setup stay fix, so all values are always the same. In macro high-speed the netto pixels on the frame is a very important factor. Most of the web sites neglect this element. The shutter lag is also an important factor, due to the postponement. But just now my first results of the insects in-flight are not too bad. |

