 Brown/blue anaglyphs (ColorCode)
 (Yellow/Blue, Amber/blue, ochre/blue)
John Wattie method version 09/02/07
Aligning the images
Transforming the images
Red/cyan anaglyphs: easy version in Layers
Red/Cyan: advanced version in Channels
Brown/blue anaglyphs (ColorCode)
(Yellow/Blue, Amber/blue, ochre/blue)
3D statue from Versailles, Paris, France and "Floating Windows"
You should take the images using a bar to mount the cameras, or to slide one camera along for a cha-cha pair. Keep the two cameras parallel (do not toe in). Even if you do that meticulously, there is still a need to align the images, if only to set the stereo window ("zero parallax"). To your surprise, the stereo pair may be rotated, despite using a bar. Hand-held cha-cha pairs will always need a lot of alignment and often transformation.
| Open both images in Photoshop. (Photoshop CS, but 7 should be very similar) |
Ctrl o |
| Select all the left image and copy it | Ctrl a / Ctrl c |
| Click on the right image and paste the left onto it, Automatically the left image will be on a separate layer 1 |
Click on right Ctrl v |
| Reduce layer 1 to 50% opacity, so you can see the background through it. | Layers palette, top right. |
| Select the move tool | Tool palette, top right |
| Move layer 1 until it is superimposed on the background. (Setting blending mode to difference can help) |
Use arrow keys for nudging 1 pixel at a time. |
| Accurately align an object on the left, preferably half way down the image. Check if an object on the right can also be accurately aligned by moving layer 1 in the horizontal direction only (x axis). If the right object is too high or low, you will have to correct for rotation. |
|
TransformEnlarge the window so there is blank space around the picture (or you will not see the next tool).Select Edit / Free Transform Mouse over the centre marker, click and drag it to the correctly aligned point on the side. Mouse to a corner and a semicircle with arrows will show up. Press the mouse key and rotate the image to achieve correct alignment. Use the arrow keys to nudge up and down until both left and right sides are perfectly aligned.If the cameras were toed in, you will also have to enlarge one side of the layer to overcome key-stone distortion. This is best done using horizontal parallax correction, because toe-in causes a parallax error. If the stereo base was too big on a landscape (where distant points are high in the picture and near points are at the bottom), slide level 1 until the most distant points are separated by 1/30 of the width of your picture. (If you aim to crop horizontally, 1/40 of the height of your screen, assuming it has the common 3/4 aspect ratio.) |
Ctrl t When all is perfect, press RETURN. Make all transformations in one step because separate transformations will gradually spoil the image. Transform on the full size image, so deterioration is less obvious when image size is reduced for the web or projection.
The distortion function changes the perspective, as if you are looking down from a height on the landscape. This reduces the parallax difference and is a subtle way to overcome the stereoscopic inverse square law of parallax. (A trick invented by the author, but possibly some unknown 3D image processor has thought it up before?) |
Set zero parallaxFind the closest object in the image. Align it perfectly using only the horizontal arrow keys. This object will be on the monitor surface when later viewed in 3D, at the "stereo window." The closest object is now at zero parallax. If you want an object poking through the window, set zero parallax further back. Avoid any object at the edge of the picture being in front of zero parallax or a window violation (wv) will occur.Advanced: The window itself can be moved forward (or even back) so it sits stereoscopically above the screen, which usually involves having a separate window frame image. Once you have a window frame, you can arrange for an object (e.g. horse's head) to emerge in front of the frame by setting the frame inside the anaglyph, with a white background. Then you can have a "wv" which is not a wv, an "in joke" for stereoscopists. |
Some anaglyph workers prefer to have the main object at zero parallax to reduce ghosts and are not obsessed with wv. Despite the logic of that, they will never win prizes! Strict workers will not allow any object to be in front of the window even if it does not cut an edge, but they probably have anal retention? |
Check alignmentBring Layer 1 back to 100% opacity.Turn Layer 1 visibility on and off to produce a "wobble stereo" and check no rotation, distortion or jumping in y plane occurs. |
Turn the background "eye" on. Turn the Layer 1 "eye" symbol on and off in the Layers palette with a mouse click. |
CropTurn off background visibility.Select with the selection tool at the desired format setting (e.g. square) within the limits of Layer 1.(Or use the crop tool) Image / Crop |
Turn off the Background "eye" in layers palette |
More advanced preprocessing OPTION:Make left and right images separately:Activate layer 1, copy it, paste into a new image called "left"Return to the first image and delete the top layer (left)Now go to advanced option for RC creation |
layer1 / ctrla / ctrlc / ctrln / left / return / ctrlv
Drag layer 1 to trash in layers palette. |
| At this stage you can go direct to making an anaglyph. It is better to make an extra step, producing two images in X or U stereo and adjust the images together so they still look the same. | |
| Set background colour to black (Tools Palette)Double the horizontal canvas size + 10 pixels (Edit / Canvas size) |
Ctrl Opt c Choose left square Double the Width number + 10 |
| Select Layer 1. Move Layer 1 into the blank canvas area to the right.You now have an X stereo pair, so go cross-eyed and check that the stereo is good. (If you cannot do that, just make an anaglyph). Flatten the image. | Click on Layer 1Select move toolMove Ctrl e |
| Adjust curves, levels, sharpness etc. Whatever you do will apply equally to both images. Ensure there is detail in both highlight and shadow areas. Not only does this make better stereo (since 3D impression partially depends on texture) but it makes "ghost busting" easier at a later step. A contrast mask may help here. | |
| Save the stereo pair. | Ctrl s |
You can choose between:
Red / Cyan or
Ochre/blue anaglyphs.
Two methods are described: working in Levels or in Channels. Both versions of anaglyph can be made either way. Short cut key strokes are given. Remember that ctrl on Windows should be replaced with the apple key on Mac.
Ensure your computer screen is calibrated or at least set up with the Apple profile tool under:
System Preferences>Color>Calibrate, then follow the directions.
(No simple tool available in Windows as far as I know). Even on a Macintosh, in Photoshop set:
View>Proof setup>Windows RGB, because more people on the internet run Windows than Mac Os.

You should be able to see all the shades of grey on this step-wedge.
A Red/Cyan anaglyph ends up in the three RGB channels on your computer screen, which can be separately processed in Photoshop. The red filter sees the red channel as black and white. The cyan filter shows green and blue channels with colour, but red is mostly grey. Ghosts: The filters are not perfect and there is leak of green through the red filter and red through the cyan filter. This leak is less obvious if the luminosity of the ghost areas is pretty much the same in red and green. Deghosting strives to get the luminosities balanced. The eye is more sensitive to contrast differences than to colour differences, which is why the "Analux" deghosting method is so powerful, especially if you use the Wattie modification depending on stepped curves (see later). Colour: Colour is never perfect but can be remarkably good in green and blue. Low intensity red is only seen if the cyan filter leaks red. If you strive for red, the anaglyph must be balanced for a leaking cyan filter, such as Mirachrome. Retinal rivalry: Cyan colours are more intense where red is dim. A blue sky looks more vivid where the red channel is dark. But difference in luminosity can produce retinal rivalry or "flicker" as first one eye and then the other is suppressed in an attempt to make sense of the confusing information. The trade-off between colour, retinal rivalry and ghosts means you should set up the anaglyph while wearing the goggles your audience will use. On the internet there is no control of that and you should balance for a "standard" or average goggle, like Proview. |
The author balances the anaglyph using Proview goggles, but gives American Paper optics IYF filters to the digital projection audience. Any residual ghosts in Proview will almost vanish in the bright IYF image, although red colour will be heavily suppressed. The red channel mainly serves to define 3D parallax but has little to do with the final colour. Ghost reduction is concentrated in the red channel. Cyan should not be changed too much or colour will suffer (or such colour as remains in a "colour blind" anaglyph). |
This is the quick, easy way but not always the best.
| Image processing should be done before proceeding to the anaglyph, because stereo pairs need different processing than for X or U stereo. Detail retained in highlights and shadows helps reduce ghosting. Reduce the contrast. Ensure there is no burn-out in the highlights and the shadows should not be deep black. A reverse S curve works well. (HDR images or gently processed raw images are good for anaglyphs). | Stereo parallax is easier to deghost if it is gentle. For example, use a stereo base of 1/60 rather than 1/30. This improves colour and minimises ghosting. Since an anaglyph is at least twice as big as a parallel pair, reducing the base is not as severe on 3d perception as you might think. |
| Select the left eye image. |
Tool Palette Selection tool |
| Copy and paste the left image over the right as a new Layer 1 | Ctrl c Ctrl v |
| Set blending mode to "screen" | Blending is top left in the layers palette |
Reduce RGB colours of Layer 1 to only red:Make Layer 1 activeChoose Image / Adjustments / Curves Take green and blue channels to zero individually by dragging the right hand end of the curve to the base-line. (Or Image /adjustments/ Levels) and enter green and blue output level as 2. If you try zero Photoshop will not accept it). |
Ctrl m Ctrl 2, drag curve to zero, Ctrl3, drag curve to zero. Advanced: you can leave a bit of green and blue in to reduce ghosts |
Reduce RGB colours of Background layer to Green and BlueMake Background activeTake red channel to zero |
Alternate method in levels: Ctrl l Ctrl 1 tab tab tab tab tab 2 Enter |
You now have an anaglyphView with red / Cyan anaglyph goggles and check everything is OK.You can do a lot of tweaking on the levels. For example if the stereo window setting is wrong, choose the move tool and nudge level 1 with the horizontal arrow keys until it is correct.If the brightness is unequal (retinal rivalry) adjust curves (or levels) on each layer until it is correct. Flatten (merge) the layersNow go to Final Adjustments |
A more advanced preprocessing OPTION designed to reduce ghosts. Some workers who are good at removing ghosts end up with very low contrast images and poor colour. Judicious balancing of colour, contrast and ghosts is recommended.
Red channel preparationThe left image becomes red, but because red often shows only part of the image detail, it is often better to incorporate some green and blue. During anaglyph viewing, the red channel becomes monochrome (lightness only) and because the cyan filter cuts it out, red does not contribute a great deal to the final colour impression. Just how well red is filtered by cyan filters depends on the particular glasses you use. Anachrome purposely does not cut red particularly hard. |
American Paper Optic IYF goggles cut red well.Mirachrome / Anachrome cuts red pretty well.Proview cuts red less well Some goggles leak red (and cyan) like a sieve and should be avoided. |
| The left image can be made from all the colours by simply desaturating it. (Half colour anaglyph). | Shift Ctrl u |
Or you can be more sophisticated by reducing green and blue in the left image before desaturating. Take advantage of this step to reduce the contrast of the left image. It is best done in curves by raising the bottom and dropping the top of the green and blue curves, while optionally increasing mid-tone contrast in the red curve. Imre Zsolnai-Nagy favours using the magenta channel from CMYK mode for the left image. |
Ctrl mAs you change the RGB curves, keep the middle of each curve in the centre of the graph or you will end up with too dark (or light) in the final red image. OR Use the channel mixer and bring some green and blue luminosity into the red channel. Since this is done numerically, you can develop a formula for doing this with some precision.
|
| Then desaturate the left image. | Shift Ctrl u |
| Check "levels". Depending on how you desaturated it may well be the image is too dark and does not cover the full 256 range of tones. Drag the sliders to the top and bottom of the histogram to correct that. | Ctrl L |
Right image preparationThe right image is cyan (blue and green). It is possible to include a bit of right red channel detail by mixing it into the green and blue channels, using the channel mixer. This is the way red flowers are turned into another colour more satisfactory for RC anaglyphs, since red is generally poorly shown. |
Image / Adjustments / Channel Mixer Choose green channelReduce green by 10, increase red by 10 (for a gentle example). |
| Reduce the intensity of the green channel, because it is the most potent cause of ghosts. (Cyan ghosting varies with the anaglyph glasses used. Some versions leak more blue than green, but my goggles leak green) |
ctrl m / choose the green curve. Lower the highlights, mid-tones or shadows and change contrast just as you like. (It helps to use a curve adjustment layer so that you can tweak curves over and again without losing density steps, which eventually causes "posterisation") |
Paste left desaturated red into right red channelSelect and copy all of the left desaturated image.Make the right red channel active. Paste into this red channel. (Pasting into the right red channel totally replaces it with the left eye version of red) |
Left image: ctrla / ctrlc Right image Click on red channel ctrlv |
| Turn the RGB eye on (click on the eye) You can now view the anaglyph.Go to Final Adjustments
Portrait FramingIn the example, the anaglyph is in a forward-projecting frame. I first saw this done by Guglielmo Menegatti and thought it was pretty cool, especially for portraits. His frame method has its own section in the soft-ware he has written, but this simple version is to put a grey frame around the image by increasing the canvas size. Select the frame, feather the selection, paint with grey. Now choose red channel and move the selection a few pixels right. Now choose green channel and move left. A good way to tell if an object is sitting above the screen surface is to run your cursor over it. If the cursor drops below the surface of the object, it is sitting proud of the screen. Floating windowsA clever way to remove ghosts and have the window frame in front of the picture, by working in Ph0toshop (rather than Guglielmo's software), is described by Shahrokh Dabiri. This is a very powerful technique, which has now also been implemented in StereoPhotoMaker. Roger Harris has a large variety of window effects. | 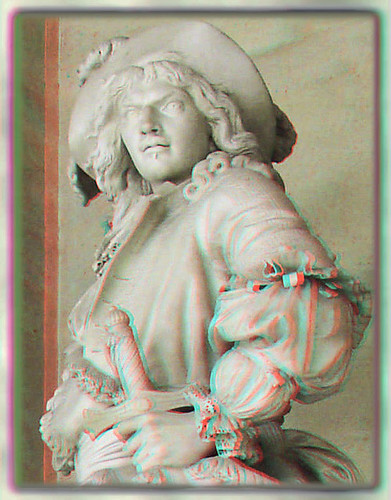 |
Gently adjust the red channel in curves Increase saturation, watching what happens to the ghosts. Often you will find a level where the ghosts are at a minimum. If you have done well with the red channel curves, saturation is often less effective. Adjust brightness. This is done in Lab mode using the lightness channel and adjusting in curves. Lab mode does not disturb the colour balance. Curves gives you tight control over highlights, shadows and mid-tones, but levels only works on the middle of the scale and the author finds that less satisfactory. Working in Lab mode is probably much the same as the Analux method for removing ghosts, except the Analux inventors use levels. The aim is to reduce contrast in the brightness levels which are causing the worst ghosts, what I call "balancing the ghost lightness." You can do this over the whole picture, or in a widely feathered selection containing the ghosts. To reduce local contrast in "curves," set a control point above the ghost brightness level and another below it, then bring these to almost the same level. You get a nearly horizontal portion of the curve at the ghost lightness. This is a very potent way to remove ghosts. Once that is done, return the rest of the curve to around 45 degree slope. You end up with a step in the 45 degree curve, right at the ghost lightness level. (It is impossible to have this tight local contrast control in "levels.") The result is some over-all loss of contrast. However, ghost lightness stays "balanced" and contrast can be increased again later, in RGB mode, without bringing the ghost back too much. Now return to RGB mode. Bad residual ghosts can be locally burned in or blurred with a small brush size and about 30% exposure level. If you still have ghosts, many workers advize changing to CMYK mode. Adjustments in the cyan channel are good for removing red ghosts. Noisy sky: blur the blue channel, often after selecting the sky. You can also adjust contrast for individual channels in curves, watching through the red/cyan goggles for the effect on ghosts. Image / Adjustments / Channel mixer can be used for advanced correction of ghosts. Be careful, heavy use of the channel mixer can reduce ghosts but also reduce the 3D effect. Dmytro Bezsmertnyy has popularised this method. |
Ctrl u LAB mode: Image / Mode / Lab colorChoose Lightness channel in the channel palette.Image / adjustments / curves. Return to RGB mode: Image / Mode / RGB Color (Failure to return to RGB mode will cause grief later!) |
SharpeningSharpening should be done with care, because a sharpened image does not save well in jpg, except at high quality settings. Sharpening can also bring back ghosts. "Smart sharpen" is best as unsharp mask introduces halos, which can spoil an anaglyph. However, judicious sharpening makes the 3D jump out much better, since it gives each eye "something to bite on," by improving texture detail. More advanced sharpening involves masking the edges, to avoid edge haloes (which are especially bad in anaglyphs) and only sharpening the low contrast areas, to improve texture. |
|
Colour correctionAfter struggling to remove ghosts you may be frightened to correct colour temperature for fear of the ghosts returning. But correction is essential if the colours have been channel-mixed to produce an incorrect over-all hue. Surprisingly, once the anaglyph is "lightness balanced" by the techniques described here, you can colour correct in at least 3 ways, with negligible return of ghosts. For example using: automatic colour or levels and its middle grey eye-dropper or variations. |
|
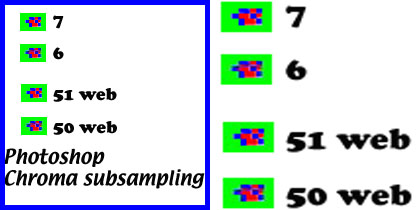
Resize and saveIt is better to resize late (assuming you have plenty of RAM) so that small errors and halos become less obvious than when you do tweaks on the final size image. Bicubic sharper or smoother can be used for resizing (Photoshop CS) and each may have a different effect on ghosts, so try both. You can always undo if something goes wrong. When saving as a jpg, do not compress too much or ghosts with a noisy pattern will show up. When saving for the web in Image Ready, always choose more than 50 (E.g. 51) to avoid chroma sub-sampling, which is very severe on anaglyphs. Chroma sub-sampling is especially damaging to sharpened images.
|
Ctrl z Incredibly useful key sequence to undo mistakes. Multiple mistakes can be corrected in the History palette.
|
ColorCode viewers are needed to see them.
ColorCode anaglyphs are made with ColorCode© software. According to Claus Krarup (previously a share-holder in the company), the colour is truly coded, hence the name. Colours in the original are changed to match the light transmission of the ochre filter. This conversion table is a secret and not revealed in  the patent.
The viewer's ochre filter transmits red very well, but green is suppressed. It is claimed that printed ColorCode pictures are very close to true colours, even when seen without the goggles. In fact there is some fringing with yellow and blue ghosts and the image has a blue tinge. This is even more obvious when ColorCode software is not used and the author's recommendation to enhance blue is followed.
Many amateurs use Photoshop. Anabuilder has a yellow/purple choice producing something near to ColorCode. (According to Etienne Monaret, this choice is changing to yellow/blue on future versions of Anabuilder.) The results should not be called "ColorCode," which is a trademark, just as Coca Cola is not Pepsi Cola.
ColorCode Cardboard viewers are made by American Paper Optics and are only slightly more costly than red/cyan viewers. Few people have them, which makes ColorCode pointless for the Internet. If you are digital projecting to an audience and supply the goggles, then of course you can use any filter colours you like.
| Have the left and right images, properly aligned and transformed, as 2 separate images in Photoshop. | |||||||||||||||||||
Prepare the right image for Blue Colour:Desaturate so that it is grey (but is still in RGB mode).Desaturation seems better than just using the blue channel, but you should experiment with both and with channel mixing as described in the sophisticated version of red/cyan creation. |
Shift Ctrl u | ||||||||||||||||||
Lighten the right image to overcome the very dark blue filter.This step is open to debate. It reduces the dark eye effect when blue is lightened, but blue lightening reduces colour fidelity and intensity on the final anaglyph. You can lighten in curves or levels, but the author favours a high pass filter, which not only reduces contrast but also sharpens the image, making it a bit easier to see details through the dim blue filter. You may have to brighten the low contrast, high pass image in levels or curves.OR you could use a custom filter, which sharpens vertical lines only, since stereo parallax depends on vertical details. For example, try these asymmetrical matrices ->The result may be too severe, but no problem, just use Edit / Fade to get just the effect you want. |
Filter / Other / High pass.
|
||||||||||||||||||
| Select the right image and copy it. | ctrl a ctrl c | ||||||||||||||||||
| Activate the left image | Click on the left image | ||||||||||||||||||
| Choose the Channels palette | |||||||||||||||||||
| Activate the blue channel | Click on Blue channel | ||||||||||||||||||
| Paste the desaturated right image you have copied onto the clip-board into the left blue channel | Ctrl v | ||||||||||||||||||
| Turn on the RGB visualisation eye, but keep only the blue channel active. | |||||||||||||||||||
| You now have an ochre/blue anaglyph | |||||||||||||||||||
Final adjustmentsWearing the ColorCode goggles you can fine tune the stereo window by moving the blue channel, using horizontal arrow keys only. Adjust the blue channel brightness to optimum using curves (or levels). Too bright and the colours will shift to blue. Red becomes less saturated as blue becomes brighter. Adjust the red and green channels individually with curves (or levels) to: suit your eyes, optimise colour, optimise contrast (not too much) and reduce any ghosts. (Ochre/Blue anaglyphs can be almost ghost-free and very close to true colour). The CC filter has a low transmission for green and in forest scenes a bit of green boost seems to help, especially with a classic S shape curve on the green channel. Adjust the colour saturation, just as described above for red/cyan, to reduce ghosts and optimise colour. A standard method to brighten dark anaglyphs using levels is given by Mathew Reeves: Adjust the midpoint gamma of the overall image after rendering the anaglyph. In Photoshop, you can do this simply by using the Levels adjustment with the following settings: |
|||||||||||||||||||
| Save as a Photoshop file, to allow later corrections. | ctrl s | ||||||||||||||||||
| Crop the image as desired | |||||||||||||||||||
| Resize the image for your projector or monitor (E.g. 1024x768 pixels) | |||||||||||||||||||
| Save using low jpg compression (51 or better in Image Ready for the web or level 7 or better in Photoshop). |

NB: ColorCode anaglyph - this will not work with red/cyan goggles.
The locomotive has been painted with a bright, happy, red and only ColorCode is able to show that.
Note how the colour in the anaglyph, seen without glasses, is close to true.
Click for a Red/ cyan version which shows red as brown:
There are probably as many ways to make anaglyphs as there are workers in the field!
Dr. Imre Zsolnai-Nagy and Bernardo Galmarini describe in detail how they make anaglyphs in Photoshop with low ghost levels. Analux-3D is quite different from the common methods described on the internet.
The red channel may be taken from the magenta channel of the image in CMYK mode, but that is optional. (Removing green and blue is equivalent)
Ghost reduction is done in LAB mode by adjusting contrast and brightness in the luminosity channel. Remember that anaglyphs should have maximum brightness possible, to overcome the darkening effect of the anaglyph goggles, so contrast changes are more important than dropping luminosity. The advantage of LAB mode is: luminosity can be adjusted without changing colour balance.
Then return to RGB mode. Increase colour saturation and adjust colour balance slowly, taking care not to bring the ghosts back again! The author prefers to do this in curves, since it gives more control, but Analux web page writers suggest levels.
Paul Weissbach is a master of very high quality anaglyphs, with virtually no ghosts, so his method is given here with great respect and no further comment.
Once the anaglyph is mounted, you have to start de-ghosting. This is a workflow of at least 7 steps. Never vary the order or go backwards. All steps are made while wearing red/cyan glasses.
Step 1= RGB Colour adjustment (reducing mainly green and blue)
Step 2= Saturation (changing the intensity of saturation in very small amounts!)
Step 3= Colour temperature (for more or less blue - no ghost influences observed)
Step 4= Contrast level (looking for a optimal contrast balance - slight ghost influences)
Step 5= Shadows (more or less information inside of shadows, a very strong tool which mainly reduces red ghosts.)
Step 6= Brightness (no ghost influences observed)
Step 7= Sharpness (colour and grey, (no ghost influences observed)
Instead of using Photoshop on a Macintosh, as the author usually does, you could use the program Anabuilder. Since it is written in Java, there are now versions for Windows, Macintosh and Unix. (The Analux-3D process is built into this excellent soft-ware, but I confess I understand Photoshop better, from long familiarity I suppose. The Ghost Buster filter seems to be a saturation filter?)
On Macintosh Os 10.4.1, you need to increase the memory available:
Ctrl click on the application/Show package contents/double click contents/Open Info.plst with textedit/Change VMOptions to xmx500m or more, depending on your installed memory.
That is not enough! Resize big 5+ megapixel camera images to smaller before opening them in anabuilder e.g. 1024 pixels wide works OK for 756mB of memory. Otherwise you will get a "Java out of memory" error when you try to save the image. This modification solved a lot of frustration for me! More detail on the Anabuilder FAQ page.
The author working on Mac has limited experience with this Windows, Japanese program, but the directions in the help files are very clear. Much easier to understand than anabuilder I find. Automatic alignment is very accurate, using a special accessory program you have to load separately into the same folder as SPM. Alignment can even be done in bulk.
Colour mixing uses an "optimised colour anaglyph" mode and is excellent since the effect is visible while wearing anaglyph glasses (unlike the method given above).
The author finds these channel settings are often good for ghost reduction without messing up the colour too much:
| Red | Left red 800 | Left green 200 | Left blue 200 |
| Green | Right red 200 | Right green 800 | Right blue 0 |
| Blue | Right red 100 | Right green 0 | Right blue 900 |
Note that the red channel adds up to more than 1000. This is on purpose because the red filter is slightly dark in Proview and darker still in Anachrome, so that 1200 for red reduces retinal rivalry by making left and right images look about the same brightness. Note that red is introduced into the right eye luminosity to make red/cyan luminosity balance better, which is the secret of "ghost busting." Red introduction does not change the right eye image to red, it just adds red luminosity to the cyan mix.
Sometimes adding much more green to red can work very well at reducing ghosts and even improve the over-all colour rendition. I have not worked out just why the colour is better! Here is an example:
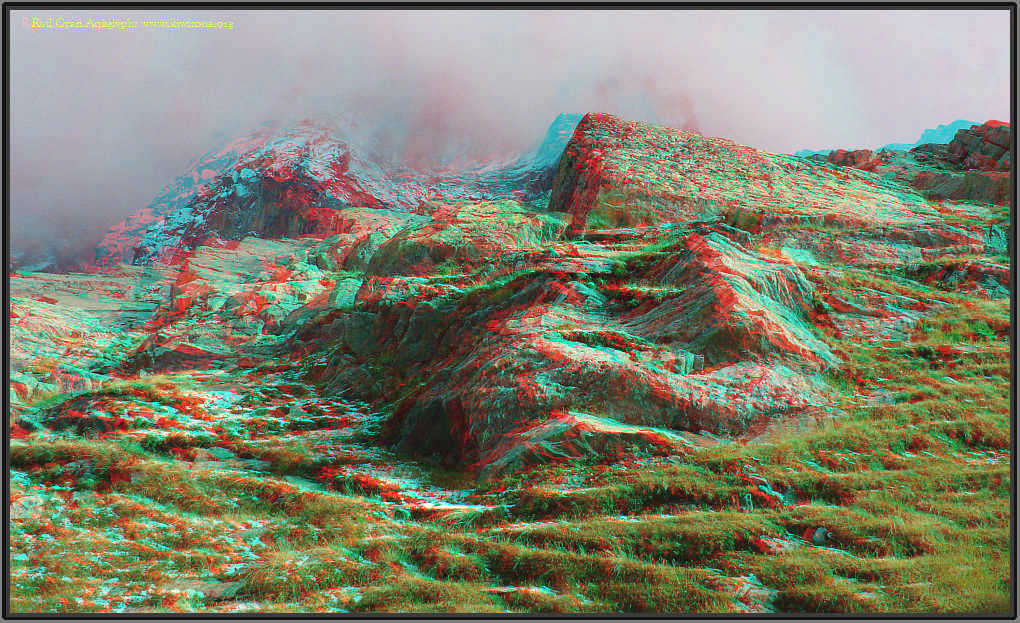 Above Chamonix, by John Wattie
NB "Above Chamonix" has been saved in StereoPhotoMaker with chroma sub-sampling turned off. SPM can produce a smaller file than Photoshop (which has no direct control over chroma sampling). Some web browsers and devices cannot handle SPM pictures (e.g. Opera, Samsung High Definition TV) To overcome that problem, save your anaglyphs in SPM as a .tif file and transfer it to IrfanView. This is a free program and if you have the correct plug-in downloaded, you can "Save for the Web." IrfanView provides a choice of chroma sub-sampling methods and for anaglyphs always choose "none." IrfanView chroma subsampling seems more acceptable to browsers and devices.
Channel settings can adjust colour balance. For example; cloudy days may look too blue, so change to:
Blue channel: right red 200, right green 0, right blue 800
Ghost busting in Lab mode with SPM uses levels, not curves, and in the author's hands gives unreliable results and strange artefacts at times. I prefer Photoshop for this phase, but if you have used the Channel Mixer wisely, there may be no need for LAB.
Jpeg for anaglyphs is best done with chroma sub sampling turned off. SPM can produce a smaller file than Photoshop (which has no direct control over chroma sampling).
Check out the SPM stereo viewers, including a stereoscopic panorama using anaglyphs. These viewers work perfectly on Macintosh Os 10.4.4, which uses Sun Java.
Mathew Reeves has written a program, which also works as an action in Photoshop, for cleaning up ghosts. It is not yet published, but I have trialed it and ghosts are cleaned up very well. However, if channel mixing and LAB adjustments have been done well, there is not much left to clean up. It tends to reduce contrast (fixed up by adjusting levels as a last step). However, Mathew points out that having slightly grey blacks is a good way to reduce red ghosts (see also Paul Weisbach) and since the anaglyph goggles do not let so much light through, grey blacks can tend darker when actually viewed.

Rocamadour, France by John Wattie.
Click on the image for more French anaglyphs by John Wattie