Depth of field in macro photography:
digital cameras versus larger formats.
The depth of field in macro photography is intimately related to the camera format but not to the focal length of the lenses.
The Secret to it all is MAGNIFICATION.
Di Marzio Depth of Field equations: pdf file Read this first if you want the strict mathematical derivation.
For a graphical simulation of Geometrical Optics Click here
I could never understand how my tiny Nikon 4500 digital camera produced much better close-up images at f9 than my film camera ever did. Also better than my more recent Canon Kiss Digital, with a 105mm macro Sigma lens, which could only match the Nikon at about f22. It made no sense to me that a tiny format, which required a lot of magnification to make a useable print, had better depth of field than a larger format. After all, the small camera needed more magnification to make the final print than a large format. So the circle of confusion had to be much smaller on the tiny format.
Since the print (say 10x8” for example) is made by magnifying the film format by the same amount every time (excluding cropping), the circle of confusion is also magnified the same every time. The circle of confusion is fixed by the film and resulting print size no matter which lens is used.
The circle of confusion is calculated by the lens focal length divided by 2000. But not any lens - only the standard lens for the format. Just because you are using a 500mm telephoto lens does not mean you can get away with a bigger circle of confusion. For example: 50/2000 = 0.025mm while 500/2000 = 0.25mm, but 0.25mm is ridiculous as a circle of confusion. This means (in the macro range) the depth of field (DOF), for any fixed magnification, is identical for any focal length lens used by:
D = 2fC(M+1)/M2)
D = depth of field
f = f number
C = Circle of confusion
M = Magnification on the filmThe Focal length of the lens has magically vanished from the formula, as we predicted it should.
(It is actually still there but is so small as to be negligible - see the .pdf file.)
Experiment: Nikon 4500 zoomed right in and right out with constant magnification
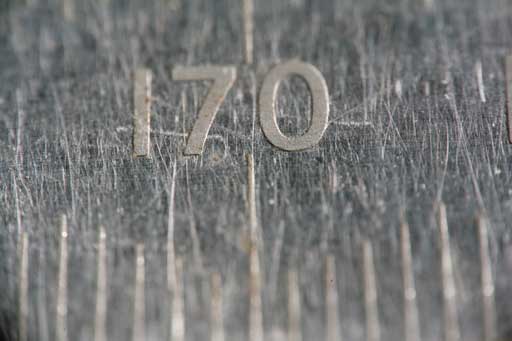
I have done the experiment of measuring the depth of field with the lens zoomed right out and right in, but moving the camera back and forth until the magnification was the same. I had a mm rule running away at 45 degrees for measuring the depth of field by how much the divisions blurred out (by eye) and another rule, parallel to the film plane, to measure the magnification.
The depth of field was the same for the extremes of zoom, as near as I could assess. On the image reproduced here, the depth of field seems even bigger than measured, although some divisions have moved or dropped out. This is because the original image has been reduced in size, sharpened and then jpeg compressed. The biggest loss of information came during jpg compression.
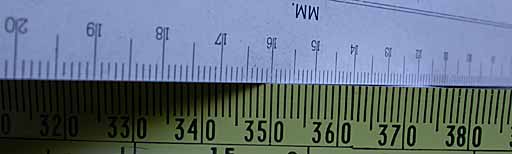
So for constant magnification, you can use any convenient lens and zoom to get the framing right, without losing any depth of field.
Magnification equals image distance over object distance.
M=(E+F)/N
M=Magnification
E=Lens extension (length of the extension tubes + how far you have racked out the lens focus)
F=Focal length of the lens (symmetrical lens).
The magnification ratio marked on the macro lens is absolute. If it is 1:1 it is always 1:1 no matter which camera format you use that lens on. 1:1 means the lens is 2F from the film and 2F from the subject.
Now if you have a subject which just fits in a 35mm frame at 1:1, it is going to be too big to fit in the frame on a smaller format, digital camera. Filling the frame is the name of the game and the magnification ratio used is subservient to that. So the small format digital camera must use less magnification to fill the frame. When you enlarge the smaller format, lower magnification version, the subject will still fill the print.
So what we are really interested in is the final magnification on the print. Just how the various cameras achieve that is only of interest if the resolution, or the depth of field changes. Well (good news and bad news): both do change, in opposite directions!
So if you want to fill the frame with the mushroom or whatever, the digital camera will do it at a smaller magnification ratio, in the camera, than the 35mm.
Also, much smaller magnification (in camera) than needed by a 6x6cm or bigger “real” camera.
Suddenly M in the formula is smaller for the smaller camera.
M=(E+F)/N
Digital camera focal length correction (Fd) to an equivalent 35mm lens.
Magnification needed is found from the size of the CCD chip, which is never quoted correctly as you never know how much of the chip is actually occupied by useable pixels. BUT all digital cameras have a focal length correction factor quoted. Fd is the correction factor which makes a digital camera lens give the same field of view as a more familiar 35mm format lens. So the size of the digital chip in mm is 35/Fd.
For my Canon, the focal length correction, Fd is x1.6
For my Nikon 4500 Fd is a whopping x4.84
The CCD chip useable pixels must be 1/4.84 of 35mm = 7.23mm (It is quoted as a 1 inch chip...)
So a 1:1 magnification on 35mm to fill the vertical frame with a 35mm tall mushroom becomes
M = 1/1 = 1 (any 35mm camera
M = 1/1.6 = 0.625 (Canon)
M = 1/4.84 = 0.21 (Nikon 4500)
The Circle of confusion, C = 1/2000 the focal length of the standard lens for the format.
The standard lens for the format is found from square root of twice the edge of the frame squared (Pythagoras)
35mm standard lens = 49.497 or 50mm, as we know well.
C = 50/2000 = 0.025mm
The “standard focal length” calculated for Nikon 4500 is 10.33mm,
(50/4.84), (which fits nicely in the known zoom range of 7.85 to 32mm.)
So the circle of confusion for the Nikon 4500 format is 10.3/2000 = .005mm
The pixel size for the Nikon 4500 is 7.23mm/2272 = 0.003mm per pixel.
The circle of confusion of 0.005mm is more than the pixel size.
This means the resolution limit is the circle of confusion, not the pixels.
A complication is: red green and blue have their own pixels and out of 4 pixels, 2 are green while red and blue have one each, so it is hard to be precise.
The “standard” F for Canon 300D DSLR is 50 / 1.6 = 31mm
C for Canon = 0.0155mm
(Fleming quotes 0.019mm)
Now rearrange the depth of field formula to give the f number needed for any particular depth of field:
f = D*M2/2C(M+1)
Now work out the f number for a depth of field, D, of 2mm when photographing a 35mm object:
35mm format C= 0.025, M = 1 f20
Canon DSLR C = 0.015, M = 0.625 f15.4
Nikon 4500 C = 0.005, M = 0.21 f6.85
For any digital camera you must first find the correction for 35mm equivalent focal length (Fd), which is given in the camera manual.
The required f number for the DOF, D is:
f = D(M/Fd)2 / (0.05/E(M/Fd + 1))
f = f number
D = Depth of Field
M = Magnification factor on the macro lens
Fd = Equivalent focal length correction, to make the digital camera field of view like a 35mm camera. This correction factor comes from your camera manual.
C, the circle of confusion, is contained in the formula;
with Fs/2000 as the standard.3 Factors influencing Depth of Field
The depth of field at macro settings depends on:
Camera format (smaller the better)
f number (bigger the better)
Magnification (smaller the better)
But it has nothing to do with the lens focal length!
While messing with these formulae in a spread sheet, I discovered the required f number for 1:1 magnification is simplified to a simple multiplication, because 12 = 1
- Nikon 4500 at 1:1 needs an f number of the depth of field in mm times 3.84 = base line
- Canon DSLR (D30) at 1:1 needs an f number of the depth of field in mm times 7.7 = 2 stops more
- Any 35mm camera at 1:1 needs an f number of the depth of field in mm times 10 = 3 stops more
"The N-times-F Rule:
The depth of field of a digital camera with a lens of the 1:N focal length equivalence ratio at a given F-setting is the same as that of a 35 mm camera with a lens closed down to the aperture number of F multiplied by N."
Example:Nikon 4500 digital depth of field is fine at f4
Nikon 4500 has an Fd of 1/4.84 or N = 4.84
So the equivalent f number for the same depth of field on 35mm is:
f(4 X 4.84) = f19
The wide angle attachment on the Nikon 4500 seems to have an even bigger depth of field than the standard lens. I now realise it is a delusion. The depth of field looks better because the magnification in the distance is less and it is harder to tell that remote little things are actually out of focus! If you magnify the distant objects until they are as big as a telephoto lens shows them, all the blur returns and you have gained no extra information. However, macro photography with a wide angle lens is a good trick to play on people (including me). This way you can show a small object in its environment. Although the perspective is "wrong" and far more than we ever see with our eyes, we usually just accept it, because we have got used to wide-angle pictures in our modern world.
When seen in stereo, the moderately distant objects in a wide angle macro view have no depth differences (card-boarding; no stereo parallax). That is because we have used a small stereo base for the near objects and the perspective distortion of wide-angle lenses reduces the size of distant objects drastically, which includes their stereo parallax.
I have friends who claim digital cameras will only be any good when the CCD chips are the same size as medium format film. I suggest they do not wait around for that in the macro world. You really need smaller chips for good depth of field.
The remarkable increase in depth of field obtained from a small format camera at macro distances was a shock to me and means I may return to the Nikon 4500 for macro work, even though it is a pain to use compared with the Canon. I could not understand why a smaller camera should have better depth of field, but all these numbers and late night cogitating have convinced me that practical observation of the images made sense after all.
An excellent description of depth of field is given { here }
Depth of field calculator for all formats, including digital, { here }
Digital camera depth of field at macro distances
Machine vision experts have simplified the formula:
DOF = 2f(P/M)(P/M)
Where P is the width of a pixel and M is the magnification.
This means depth of field is proportional to the square of the pixel size and inversely proportional to the square of the magnification.
Practical application of digital depth of field mathematics
The surprising deduction is that if your digital camera has more pixels than you are going to use in the image, you are better to reduce the magnification and crop down the image in Photoshop to the pixels you need. This is the reverse advice to "filling the frame" with the object you are photographing and does not come naturally to those of us who worked with film.
For example, my Canon digital camera chip is 3072 pixels wide, but my digital projector is only 1024 pixels wide. The way I used to work was: take the macro image filling 3072 pixels, then reduce the size in Photoshop to 1024 pixels, using bicubic sharper interpolation.
Now depth of field varies inversely as the square of the magnification, which means reducing the magnification is going to have a very big effect. I am better to only fill the frame to 1/3 while taking the image and then crop the picture to 1024 pixels.
In this way my Canon camera gets improved depth of field, rather like the Nikon 4500, because effectively I am using a small chip. But I get the advantage of the Digital SLR being easier to focus on the dark forest floor than the Nikon 4500 with its tiny screen. Also with reduced magnification the effective f number is less. I do not need to stop down so far and run into diffraction problems, long exposures and reduced lighting from the flash guns. So what is the bad news? The image only has 1024 pixels and cannot be enlarged much beyond a 6x4 print. In the stereo world, this is no problem because Holmes Cards and computer screens are still nicely catered for.
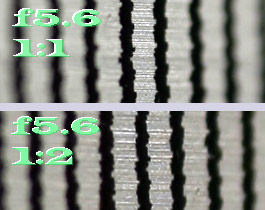
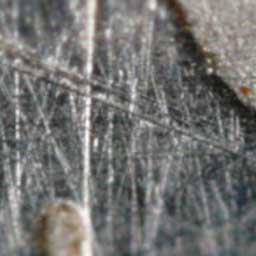
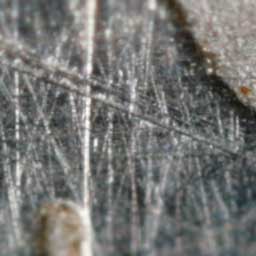
Both images of a steel rule at an angle were taken by a Canon 6.1MegaPixel camera at f5.6
Magnification on the top was 1:1, then reduced in Photoshop.
Magnification on the bottom 1:2, shown at actual pixels, but cropped to a tiny part of the frame.
Which method gives the greater depth of field?
A problem with this method is photographing at a small magnification makes it more difficult to get the focus correct on the object of interest. That is why the lines are not aligned: I got the focus wrong!
Magnification versus Depth of Field: Anaglyph example
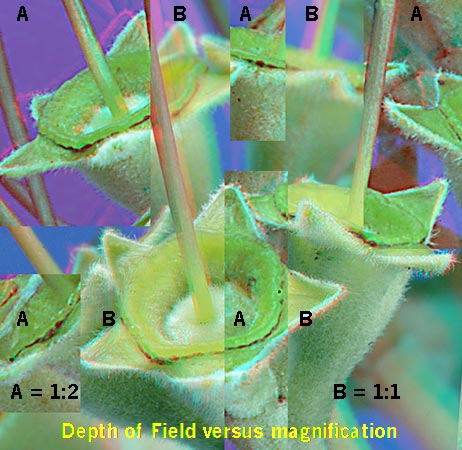
In this anaglyph, A was taken at 1:2 magnification but B at 1:1. The f number was kept constant at f45 as marked on the lens. This converts to f90 at 1:1 and f64 at 1:2 magnification.
During post-processing, the two images were converted to nearly the same size and then "jigsawed" together . Viewed in stereo, you can see how the depth of field is much better when the subject is photographed at low magnification and enlarged later. Also note how the change in perspective when the camera moved further away for the lower magnification means you can only get one depth level at equal size on the 1:1 and 1:2 images.
You need a high quality lens, for low magnification to produce great depth of field, and you sacrifice the ability to make big enlargements. For Holmes cards and the web, there is no problem.
Effect of pixel numbers
Using a Canon 5D, the effect of changing the number of pixels was a big shock, because it made no difference!
- According to the above formula, depth of field is improved by the square of the pixel size and it was not, so there seems to be a problem.
- Even worse, the image resolution was not improved by using 12 megapixels as compared with 4 megapixels. This is not just a problem, it is an expensive mistake!
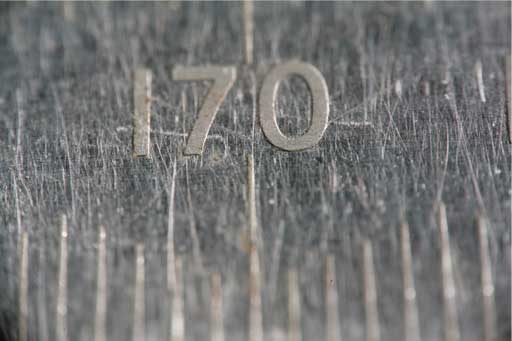
Experiment:
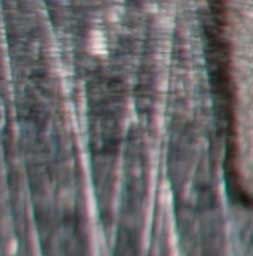
The image of a steel rule was magnified 2.7 times in the camera.
This was done by using the 105mm Sigma macro lens racked out to 1:1 magnification and then screwing a Nikon f2 35mm lens backwards onto the Sigma lens. This made a very high quality "supplementary lens". The Sigma lens was set to f11, which an experiment (described later) shows does not cause much diffraction.
The rule was at an angle of 37 degrees to the camera axis, so as to check the depth of field. (Textures and fine scratches make good, non-quantitative test objects for DOF and resolution.)
A) First image was taken at 4595x2912 pixels giving a 3.3mB file size. (12 megapixels)
B) Second image was taken at 2496x1664 pixels giving a 1.3mB file size. (4 megapixels)
This second image was then enlarged in Photoshop, using bicubic interpolation, to bring it up to 4595x2912 pixels. Enlarging an image is supposed to degrade the resolution.
 A
A
 B
B
It is impossible to see any depth of field difference despite B having bigger pixels than A!
To prove it, here is a mouse roll-over to allow close comparison:
A and B: roll-over image.
Now a 12 megapixel camera should give better sharpness running at maximum pixels than when it is dropped to 4.1 megapixels. Shouldn't it? Isn't that the point of paying for 3 times as many pixels? Well, don't hold your breath because these roll-over images show no detectable difference!
Centre of field:
 Perhaps a slight difference?
Edge of field at original pixel size:
 No difference
In case your browser does not allow mouse rollovers, here they are side by side:
Centre of field:
Edge of field:
Now tell me which is the 4.3 megapixel image enlarged and which the 12.7 megapixel image not changed in any way?
Answer: The left image in each case is the 4.3 megapixel image.
This was a shock to me. The only good news is the relative lack of colour fringing at the edge of the field. This applies to both the 12.7 mP and the 4.3 mP images. I also did the experiment with a simple supplementary lens and the distortion plus colour fringing was truly horrible. There is no doubt a reversed Nikon lens makes a superb supplementary lens for macro work.
Possible explanation of lack of change in depth of field and resolution as pixel numbers are changed.
The Canon 5D has so many pixels to produce superb resolution, that a lens producing a poor quality image becomes the limiting factor. The combination of Sigma macro and Nikon wide-angle resulted in a reduced quality lens system, despite both being outstanding lenses. 4 megapixels seems to be good enough to record the resulting image faithfully and the 12 megapixel sensor added no extra information. As "JR" said when discussing my experiment on the internet, it is like using a fire hose. If you only use a garden hose nozzle, you get no more water out than a garden hose supplies. So the lens system was restricting the resolution, like a garden hose nozzle, when I really needed a big fire hose nozzle.
Since the depth of field did not change either, it seems reducing the pixel numbers in a Canon camera is not done by adding a bunch of small pixels together to effectively make a single big pixel, as I assumed.
I suspect the Canon 5D on-board computer takes the images at maximum resolution every time, using all the pixels. The smaller pixel count is achieved by averaging the pixels, by bicubic interpolation for example, so that only a few pixels are stored on the memory card. When I blew the small image up in Photoshop, using bicubic interpolation, all I did was reverse the mathematical compression already done by the camera. So no effect on the depth of field because the pixels at the time of taking the picture were still small. Now this is speculation on my part but might make more sense than assuming the depth of field formula is wrong?
Conclusion:
to increase depth of field using the
DOF = F(P/M)(P/M)
formula, you can change the magnification, easily but the camera is not going to let you change the pixel size.
Diffraction
The next step is: deciding how far you can stop down a lens before diffraction begins to spoil the image. I already know from ordinary photography that my 105mm macro lens has worse resolution at f45 than at f16 and choosing the f number becomes a trade-off between resolution loss and depth of field gain. When a macro lens is wound out, the effective f number climbs.
Effective f = (Focal length + Extension) / lens aperture.
For 1:1 macro photography:
Extension = Focal length, so the effective f number doubles (2 stops).
- Magnification makes diffraction even worse
- and means flash guns seem to have only 1/4 power at 1:1 magnification.
The effect of diffraction has been computed by Frank Di Marzio here. This .pdf gives the trade off between depth of field and diffraction, including how much you can enlarge a photograph knowing the f number it was taken at. Frank agreed that theory has to give way to practice, especially using a digital camera and so I devised the following experiment.
Diffraction experiment:
A stainless steel watch back was photographed at 1:1 magnification using a Canon eos 300D digital camera (actually, the Japanese Kiss version) and a Sigma 105mm macro lens. The f number was set, using manual mode with 1/200 shutter speed and lighting was compensated by automatic flash (ETTL). The camera read-out does not compensate for the rise in effective f number as the magnification increases. So f16 is really f32 at 1:1 magnification. The example given here is using all the pixels and is only a tiny part of the 1:1 images. The drop in resolution as the f number climbed was just detectable at f10 but f16 was pretty good. f22 and beyond were bad.
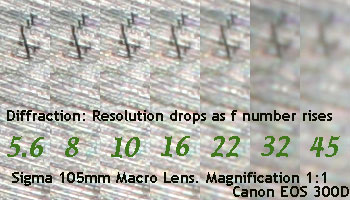
The reference books for film cameras say diffraction first cuts in at f10. It so happens f10 was the limit in this experiment, but effectively it was f20 because of the lens extension of twice the focal length to get the 1:1 magnification. So it seems from this experiment that the lower resolution of a 6megapixel camera compared with film allows 2 stops more before diffraction is detected.
At half the image size, you can possibly get away with f18 when struggling for maximum depth of field and web images are even smaller than that.
An 800 pixel web image is only 0.28 of a Canon 300D full size image. The original image has been reduced from 3072 pixels wide to 800 pixels using bicubic/sharper method in Photoshop. A small segment from each f stop setting is shown here.
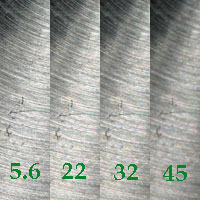
f32 is acceptable when taking 1:1 macro shots with a 6 megaPixel digital camera, if you are only going to use an 800 pixel image, but f45 is not so good.
This implies that outside the macro range, landscapes for example, you could get away with Ansel Adams fabled f64 but only for 800 pixel images. I can't do the experiment as I do not have an f64 lens!
Trade-off
In practice you will decide:
- on a small f stop to give maximum depth of field, with reduced over-all resolution;
- or f11 for amazing resolution, but poor depth of field.
There is now a way to get both, without trade-off but using clever computer skills. It is image stacking. Multiple images are taken and only the sharper bits of each are used to make the final, blended image. For example, Helicon Focus.
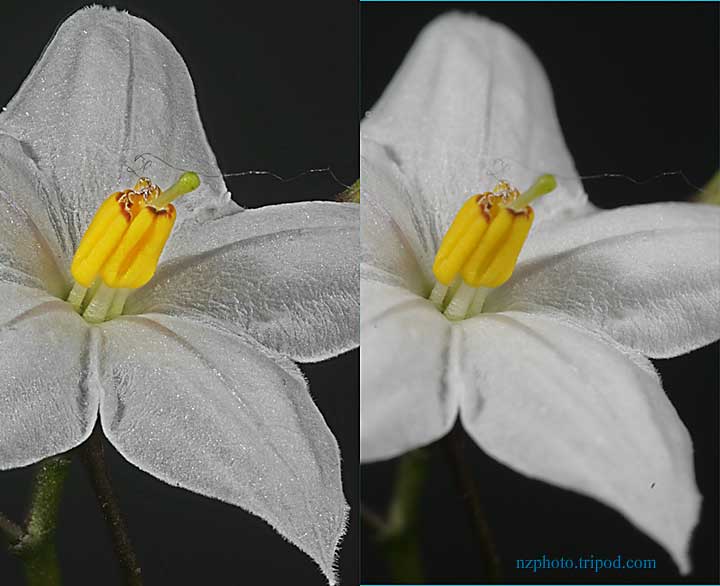
Small creeper flower: Clematis. One of 6 images stacked together to make the final sharp image on the left. The original is a far bigger Canon 5D camera image, taken at f11 using a Sigma 105mm macro lens, lighting by two flash units. Stacking allows a deep depth of field, with no diffraction, in a picture suitable for publication and printing at a large size. The tricks described earlier for getting great depth of field work only for a small image, suitable for digital projection or computer screens, but not for use on a calendar.
Another Helicon Focus enhanced d.o.f. image: anaglyph macro 3D
Details for depth of field versus diffraction for film cameras is well covered here.
Digital camera details are not well covered on the internet and I prefer experimenting with my own equipment, as above.
Close-up stereo:
If you are trying to be "professional" and make pictures which do not give people headaches, there are some limits to what is possible.
The "requirement" to avoid any keystone distortion and bulge limits the stereo base, because you cannot "toe in". Lack of toe-in means the stereo pair will always have an infinity window, which has to be corrected later.
If despite all advice you do toe in, then you will need to correct later with a specialised viewing system such as toed in slide projectors, using the Eric Scanlen formula and nomogram. Or the images have to be distorted during post-processing in PhotoShop. Wait with baited breath for details of this to be published here!
Next: stereo base and window for distortion-free macro photography
Go Back to stereo home page
