 Click the glasses to find out where to get them.
You will need red/cyan anaglyph goggles to see the stereoscopic pictures.
Click the glasses to find out where to get them.
Instead of taking a picture, then running to capture another, it is more efficient for wide base stereo to ride in a smoothly moving vehicle, while capturing pictures out the side window, at right angles to the movement. The smoothest motion comes from a boat on calm water or an aircraft flying straight and level. The delay between images depends on the speed of the craft. Take a series of pictures and choose the best pair later. Some stereographers call this process "taking sequentials." If the motion is rapid, put the camera on motor drive (burst mode) and keep aiming at the same point as you photograph, taking care to have the camera parallel to the direction of travel, which is the horizon if you are going straight and level. Aiming at the closest object is common, but causes toe-in. In theory you should aim at the most distant object, but this rule was made for film photography. With digital images, perspective corrections can be made later, during post-processing in Photoshop, or StereoPhotoMaker, so do not worry unduly about where you aim. Just make sure whatever it is stays in exactly the same part of the frame, with no moving of the aiming point up or down (which causes vertical perspective errors) and no rotating of the camera. However, even those faults can be corrected in digital post processing, which is just as well when your boat is rocking. If the craft is slow, take pictures when you see there has been a slight change in the alignment between near and distant objects. Experience with cha-cha on the ground will help considerably in deciding this. Stereophotography from a train or car is possible, but frustrating as you will quickly find. Telephone poles and fences are too close for stereo and get into the picture without warning (often into only one of the stereo pair, which is disastrous). Reflections in bus windows are a pain. However good stereo from a bus can be done, as "The Wagman" has brilliantly shown with his "Drive by Stereo" in Rome:
Stereo from a bus by "The Wagman" (Raymond Michael of Canada): reproduced with his permission. Drive by stereo can be spoiled by people or traffic moving between the two images, but Ray has cropped off the bottom, where the movement was. In the process he made a 1.66 aspect ratio format, which nicely suits a modern wide-screen computer monitor or HDTV.
|
NASA , ESA and other space faring people have made images available on the internet which amateurs, like you, can turn into stereoscopic pictures.
Hadley Rille on the Moon was imaged in stereo by Apollo 15 and the yellow dot shows where the Eagle landed.
Search Google for images of the solar system suitable for stereo, especially Moon, Jupiter and Mars, Mars2
The sun in STEREO is available on this web site.
Stereoscopic photography from a boat
Auckland Harbour Ferry Basin photographed in stereo by John Wattie from Graham Kyd's yacht.
Here the stereo base is too short, which makes the buildings look like cardboard cut-outs (card-boarding), but this version is presented so beginners can easily fuse the images, without eye strain.
D0
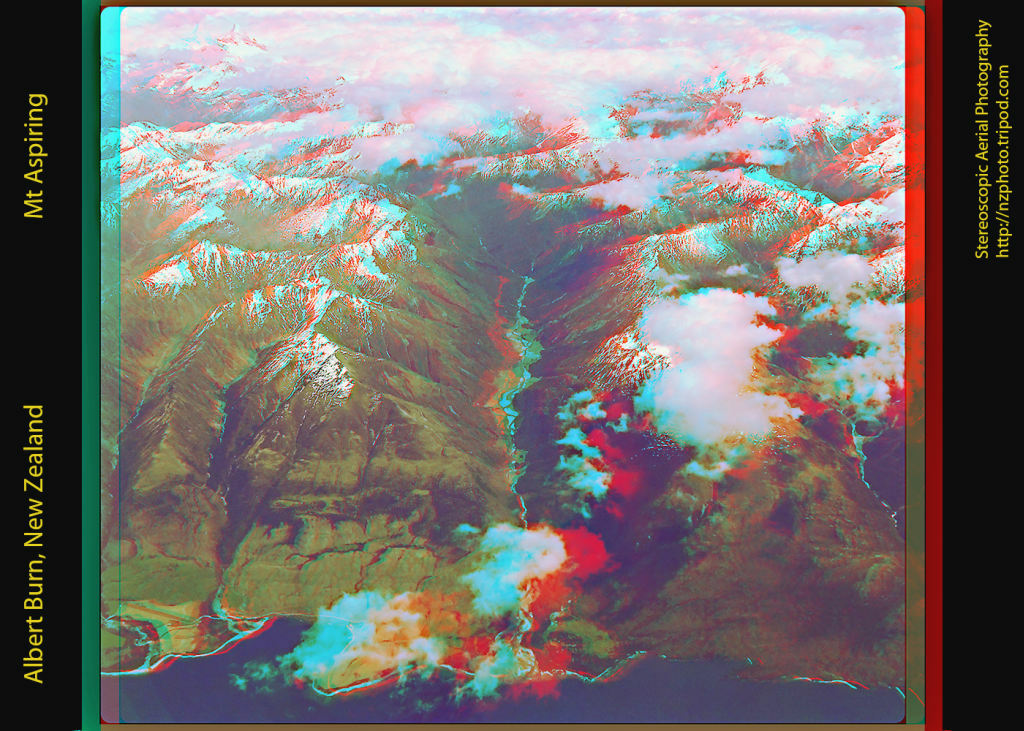
Stereoscopic photography from air-craft
Albert Burn flows into Lake Wanaka through a V shaped valley. Mt Aspiring is a glacier carved mountain, looking like a tooth in the left background.
A floating window has been applied to keep the distant disparity (Mt Aspiring) down to 10mm (D1).
Aerial stereoscopic photograph by John Wattie
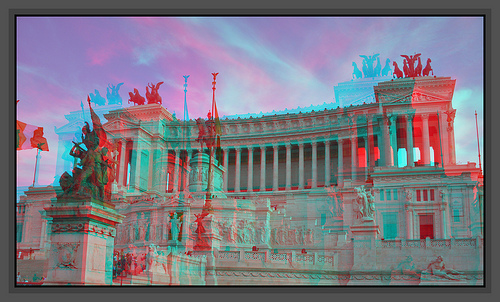
Pseudo-phanotogram
There is another trick to reduce excessive distant disparity during image processing, which I call "pseudo-phantogram." This allows anglyphs, which may be difficult to view by a neophyte, into a rather spectacular 3D image in which buildings seem to project out of the frame.
Notice how the red and green images superimpose at the bottom of the frame and diverge into the distance. But the buildings are at disconcertingly different angles, crossing over themselves in an X pattern, when the scene is viewed without the 3Dgogs.
When viewed in stereo, the angled buildings climb up towards you, until the tallest of them emerge from the frame.
Buildings behind the frame edge are seen with only one eye in what are called "monoscopic areas." The pseudo-phantogram process reduces the size of the monoscopic zones, leading to more comfortable viewing.
Image processing by John Wattie.
D1
Stereoscopic photography from kites
Aerial photographs, including kite aerial photography, some anaglyph, can be seen in 3D Aerial Photography
Aerial Photogrammetry
My father introduced me to stereoscopic aerial images while he was a government surveyor and after retiring he worked for New Zealand Aerial Mapping (Hastings, N. Z.) as ground-control surveyor. My early exposure, at age 9, to hills on a photograph coming up out of the picture explains my fascination with 3D ever since. Within a week of getting my first camera, I pretended I was an aircraft and made a stereo pair of a flower garden as I "flew" over it.
(I did not know this was to be later called cha cha technique or side-step stereo.)The Beechcraft, in which Piet van Asch later kindly took me for a flight, had a hole cut in the floor so the large format aerial camera could look straight down. The film was in a large roll and passed behind the lens and shutter rather like a movie camera, but slower. A series of vertical images were recorded as the aircraft flew straight and level, each large format frame overlapping the previous by about 55%. The dark-room man showed me how the frames had to be dodged, because the side closer to the sun had more shadows and was duller than the side away from the sun, which displayed more of the bright side of vertical objects. The frames were then made into mosaics, another skilled dark-room task.
Adjacent frames could be viewed in a stereoscope, but the aim was setting them up in a Wild A7 Stereoplotter (made in Switzerland) for production of contour maps. The stereo pair had to be precisely adjusted in the plotter to give correct heights, and providing those heights was the job of a ground control surveyor. (Recent stereo-plotters are digital, but this was analogue and worked with levers and screws.) The operator saw a dot in 3D which he had to place on the ground surface. He then panned around the images, keeping the dot on the ground. The plotting table on the right followed the panning movement and drew a contour line. The image separation was then changed accurately and locked, so the dot ended up on higher ground. By panning the stereo images again, a higher contour line was drawn, until eventually the plan was covered in precise lines. Height cross sections were made from the contours. Road engineers could compute how much dirt needed to be dug out from high parts and filled into low parts to make a gently graded road, with easy curves, through the rugged New Zealand hills.
This is not the stereoplotter I remember from over half a century ago, but looks like it.
Image from www.wsdot.wa.gov
Further examples of aerial photography in large format pairs (not anaglyph) can be seen in 3D Big Pairs.