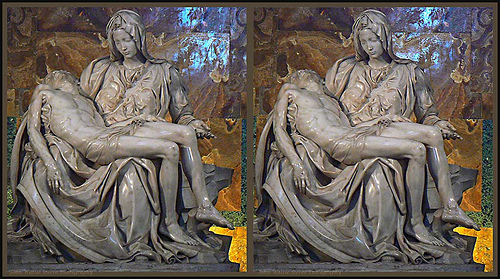
 Stereoscopic images require two pictures taken side by side, just as your two eyes are side by side.
The image pair are often taken with one camera, which is moved sideways to get the stereoscopic shift.
An easy way is to hold the camera to your eye in the usual manner and lean to the left for the first image, then lean to the right for the second (Cha-cha). Keep the camera aimed at one spot and do not tilt it. The only movement should be in the horizontal plane.
It is easier to keep the aiming point on an object in the fore-ground. We used to say, in the old film camera days, that it was better to keep aiming at the most distant point because this avoids "toe-in." In digital photography this is not a problem, since the horizontal perspective distortion from toe-in can be corrected during computer post-processing by doing a perspective correction.
 The distance the camera moves is called the stereo base. Starting out in 3D photography, keep the stereo base at about the distance between your eyes, often done by aiming through the view-finder with each eye in turn. The inter-ocular distance varies between people, especially children but is usually 60-70mm, with 63.5mm the often quoted average. Photographers usually work to a 65mm base, or say they do. Let's face it, the base measurement is not critical and it is simply good to be in the right ball-park.
Side-step stereo
Soon you will experiment with bigger stereoscopic depth than normal, which needs a bigger stereo base. (Hyperstereoscopy) That is where the side-step comes in because it provides four different stereo bases and you can choose the best later:
-
Lean to the left (click)
-
Lean to the right (click)
-
Step to the right (click)
Three different stereo bases: 1 - 2 - 3 - 1
You will also find there is a limit to how close you can be to the nearest object for acceptable stereo and it is about 2 meters with a 35mm lens (See stereo base).
The ideal stereo base varies for different stereoscopic viewing methods. If you want to view on a computer or in a book, the depth correct for projected stereo on a screen is too flat, as we will soon find out when discussing "roundness."
Astronauts used side-step to obtain stereoscopic shots on the moon with their big Hasselblad cameras, so "cha-cha" is also called "the astronaut shuffle"
The little finger trick
Your little finger, held up vertically at arm's length, covers about 2 degrees.
- Choose the closest object to be in the picture and align it on one side of your finger.
- Note the most distant object and have that sitting above the nearest, on the same side of your finger.
- Now sway or move sideways, keeping the most distant object aligned, until the closest object emerges from the other side of your finger.
A little finger of movement is pretty near right to produce a 2 degree stereo shift.
A 2 degree shift is the same as a 1/30 stereo base.
1/30 is the magic number for good stereoscopic perception in a stereoscope.
The 2 meter (6 feet) rule
The closest object in your stereoscopic image should be no closer than 6 feet (2 meters). This rule was worked out for a 35mm stereo camera, such as the Stereo Realist, using a 35mm focal length lens. But the closeness rules still apply to a digital camera, using a 35mm equivalent focal length. Including the popular Fuji W3 digital stereo camera. In fact when you start out in 3D photography, with a standard camera, you should aim to have the closest object as near to 2 meters away as you can. More than 2 meters and the stereo will be disappointingly flat.
Of course the 2 meter rule does not work if you get into close-up, macro and telephoto stereo, and we will discuss later how those are handled.
The dirty view-finder trick
The correct parallax can be set up in the view-finder by bits of dirt, or on the view screen of a digital camera by various letters and symbols placed by the camera maker.
- Set the camera zoom to 35mm focal length in 35mm equivalents.
- Use the "2 meter rule." Find something with a sharp edge at a measured 2 meters away, in front of a distant vista.
- By shuffling side-ways, align the edge of the 2 meter object with a clear object far away (e.g. a tree on the horizon). Preferably have the camera on a tripod, stereo bar, or convenient wall, to allow precision measurement of the stereo shift.
- Now shift the camera 65mm to the left (or right). The close edge and the distant tree will no longer be aligned in the view-finder, but keep your first "dirty mark" on the close object.
- Make a second mark on the view-finder, or find a convenient bit of dirt, which lines up with the distant tree.
The distance between the two marks on your view-finder is the correct, two degree parallax.
These marks can be used again when adjusting your stereo base by cha-cha.
- Any focal length can be used this time.
- Line up the near and distant object (the near object can be any distance).
- Put one of your marks on the lined up objects
- Slide horizontally sideways, keeping the first mark on the near object, until the far object lines up with the second mark.
- The shift is the correct stereo base. It measures 2 degrees parallax.
This works for any focal length, any distance to the nearest object and any distance to the far object, including "infinity."
The base-line arranges all depths to be in the 2 degree range of acceptable stereo disparity. It is very good for setting up hyperstereo.
Fuji W3 stereo camera for side-step images
The W3 has a fixed stereo base between the two lenses. If you want a bigger base, there is a setting for cha-cha stereo. This turns off the right hand channel and both pictures are taken, in sequence, through the left channel.
The W3 side-step setting shows a dim version of the first capture still sitting on the digital view-finder; so that when you step sideways, the new picture and the previous picture can be aligned precisely. Add in the "dirty view-finder trick" and you can ensure the stereo base is correct, at the same time tilts and errors in alignment are being fixed.
The wide angle lens rule
Stereo depth looks better with a wide angle lens. This is a simplistic rule, but widely quoted in the 3D movie business. We will later discuss how you can get very nice stereo from telephoto lenses.
Digital camera focal lengths are much less than 35mm film cameras (unless you are using a DSLR with a big CCD equal in size to a 35mm film frame). But digital focal lengths are always quoted in 35mm equivalent terms. That means the digital camera will take a picture with the same angle of view as an equivalent 35mm film camera, when both are working from your present camera position.
The stereo base can be increased for wide-angle stereo and still keep all depth levels in the acceptable range. The "dirty viewfinder trick" can sort that out and you do not have to resort to calculations, unless you need precision and algebra fascinates you
Persistence of perspective and parallax
When a digital image is enlarged and printed, the picture geometry will look the same as if it were taken with the equivalent 35mm film camera.
This is called "Persistence of Perspective"
In stereoscopic photography, if the equivalent focal length is the same and the stereo base is the same, digital and 35mm film cameras will have another equality called "Persistence of Parallax."
These two persistences mean that you can handle a digital camera just as you would an equivalent 35mm camera and end up with stereo pictures which have the same stereoscopic depth and perspective.
For realistic stereo pictures on a common computer, it is easier to use a lens focal length (zoom) equivalent to 50mm focal length, expressed in 35mm camera terms. This gives an angle of view of about 42 degrees, which is about the angle of view of your computer screen, when it is placed at a comfortable viewing distance. Reproduction of a familiar field of view and perspective is why a 50mm lens is called "the standard lens for 35mm photography." It is also a good standard for 35mm stereo photography, when combined with a camera shift of 65mm.
However, 3D photographers often prefer a shorter lens, say 35mm, and it is rare to become obsessional about reproducing realistic stereo depth. In fact a bit too much depth is often preferred. If you are going to all the bother of making a 3D picture, the depth should be obvious in the resulting image.
Modern wide aspect ratio computer screens (1.6) cover more than 40 degrees. Working for letter-box format screens it turns out you are better off using 35mm equivalent focal lengths, or even 28mm.
Do not get obsessional about all this as you start out in the hobby. 3D looks good from a wide range of cameras and taking conditions.
Stereo sliding bar
It is only too easy to tilt your camera between the two cha-cha images (as the little karate girl is doing, above). Although misalignment can be repaired during post-processing, many of us prefer to get it right from the start and screw a horizontal bar onto a tripod to slide the camera along. This becomes more important with close-up stereo photography and telephoto stereo, which have rules of their own.
Movement in the scene
The side-step method looks funny, or even fails when something moves between the two images (clouds, blowing leaves, people, vehicles, animals).
A favorite method to overcome movement is having the camera on rapid sequence mode (burst mode) at 3 frames per second (or faster). Move the camera sideways rapidly while firing and slow movements in the scene often become insignificant when the preferred stereo pair is mounted.
Moving clouds can move in the sky until they are stereoscopically in front of near-by objects. To avoid that, make sure the sequence of cha-cha exposures is in the same direction as the cloud movement. That will keep the pesky fluff behind the mountains.