Check, check and check again. You can never double check enough when you shoot in 3D.
What you think is normal in 2D, becomes a problem in 3D. Your setup, your lighting, your filming. Forget what you know about 2D film-making and prepare to relearn to be 3D proficient.
There are two methods of filming. Converged and parallel.
Converged is where you move the cameras lenses towards each other. Where the lens beams cross is the point of convergence. Parallel is when both cameras are facing straight ahead. For this set up, I am setting up for parallel shooting.
This article is detailing experience I have found in the basic setup for a beam splitter rig. This presumes that your rig is not motorized, your lens, zoom and focus are all manual adjustment. Setup of a motorized system with synchronous lens, focus and zoom adjustments will be addressed in a different article.
Karl Schodt with his stereoscopic cine mirror rig.
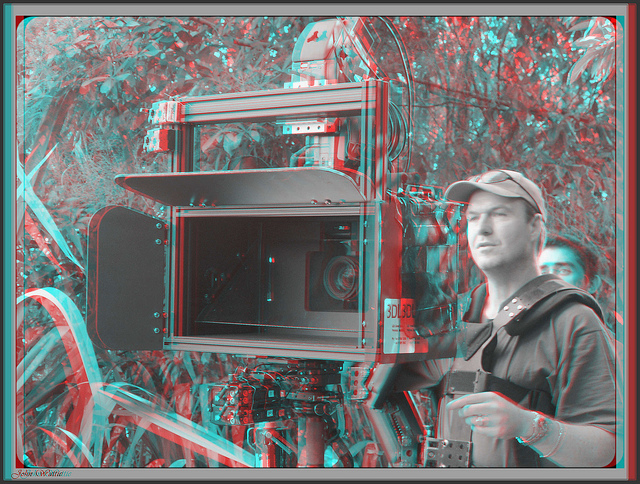
Click image for bigger version
Stereo photography and red/cyan anaglyph by John Wattie
Get yourself a nice area to work in and identify all your equipment. Make sure you have everything you need.
The first thing I do is take out the cameras. They should be identical model cameras, gen lockable( where both cameras are perfectly synced to each other), and the lenses need to be identical. If any of these are not present, you are opening yourself up to problems.
I mark the one camera with a L and the other one with a R. Preferable with different coloured tape and colour code all the cables for each camera.
I then access the menu of one of the cameras and restore all settings to the default. I then put in the settings that I want. When happy with my settings, I transfer the data to the second camera after restoring all settings to default on the second camera.
Steadishot is deactivated on both cameras.
I activate the viewfinder settings for focus and zoom and iris in both cameras and then test the focus, zoom and iris marks on identical points to make sure they match. If they are out, then I make note of the difference for taping onto the side of the mirror rig.
I connect the cable to genlock the two cameras together, switch both cameras to free run (a setting on the cameras) and then make sure they are synced together.
Once happy with that, I disconnect the cameras and mount the cameras onto the mirror rig, left on the top and right on the bottom. The top camera faces down into the mirror rig, while the bottom camera goes straight forward.With a single mounting point, it is hard to get the cameras so that they do not move slightly, but they must be aligned properly.
Once the cameras are fitted to the mirror rig/beam splitter, I check the distance between the cameras and zero them so they are in identical inter axial distance. ( I do this visually and with rulers to get them as accurately as possible). Precise measurements are not possible on basic rigs.
Once I am happy that the cameras are lined up, I mount a ruler on the top of the rig and line up the ruler to the middle of the lens on the top camera at 0cm, I then stick the mirror down.
I then usually move the left camera(top) to approximate an interocular distance of 6.5cm to start me off. (This setting will alter per shot based on distance and lens).
Then comes the mounting of the mirror. This needs to be done carefully and the side of the mirror you use needs to be checked. Put a fingernail to the side of the mirror. If where your fingernail joins the mirror is precisely reflected, then that is the right side facing out. If there is a gap between your fingernail and the mirror then you need to switch it around. Mount the mirror and secure it in place.
I then make sure the mirror is set at a 45 degree angle. I look visually from the front to see if the twin lenses match on the mirror. If not, I adjust to try to get them to match.
Make sure the mirror is clean and if there are marks then clean carefully. The special coated mirror is very sensitive. Don’t clean it with acid detergent. Use a dry micro fiber cleaning cloth to wipe off any dust or dirt, or a slightly humid micro fiber cloth wetted with water and denatured ethyl alcohol mixture (1:1) to clean off grease or oil.
Lightproof the box. Anywhere there is the possibility for light to come in, cover with black tape. I put a cloth over the top camera to prevent light seepage.
I then connect the cables to genlock the cameras and connect the video output to a monitoring system, such as dual polarized projectors, or a 3d monitor, to check on the alignment of the cameras. Set the zoom to wide on both cameras, focus to the same point and iris to the same setting. I use a grid in front of the cameras to assess the alignment and prefer using anaglyph in my monitoring as this gives me a better idea of how the 3D is.
If one camera has a light loss of about a stop, I suggest you counter this by adding a Neutral Density (ND) filter to the other camera, so both cameras match. With different stops you would get different depth of fields and so possibly affect the 3d, but the ND filter overcomes that .
I would then put a large white board right in front of the camera rig and white balance both cameras. It is virtually impossible to match the cameras with white balance due to the colour of the mirror but the closer you can get it, the better for your post-processing house.
Once I am happy with both balances, I would double check everything, and then be ready to start shooting. I would think that this set up should take no less then two hours. Longer is better.
Remember, with 3d, if you don’t have a test day, then your first day of shoot will be your test day.
There have been a lot of new mirror rigs coming onto the market in the past 18 months. You get everything from the basic rig, whose set up I have gone over today, to state of the art systems. In all systems you need time. Time to make sure everything is set up properly and working as it should be. If you are not familiar with 3D, then do not expect to set up and go out quickly, if you don’t know the basics of 3D then you will need time to test yourself and find out how 3D works. This is not your normal 2D filming!