Stereoscopic microscopy, with no microscope!
Your digital camera becomes a low power stereo microscope when the methods described here are used. Perfect stereoscopic perceived depth (roundness) is obtained. By using focus stacking, the result is better than a stereo microscope, because everything is sharp without turning a focus knob.
Toe-in
In the first edition of this web site I stressed close-up photography with no toe-in.
That was written for film stereo in which it was very difficult to correct for perspective errors caused by converging the cameras.
With digital macro photography, converging the cameras is no problem. Perspective errors are corrected during post-processing. With StereoPhotoMaker program (free) the correction is automatic.
I now recommend toe-in for high magnification macro stereo, since it allows wide format images that fill modern letter-box shaped computer and TV screens. My studies of stereo roundness (stereoscopic perceived depth) are now incorporated in the convergence method, which is readily combined with focus stacking. It can all be done without mathematics!
Jump over the mathematics and go direct to practical methods for high magnification, macro stereo photography, in wide screen format, using just one camera, with extension tubes, and no calculations!
Stereoscopic Macrophotography in Anaglyph Format
by John Wattie.
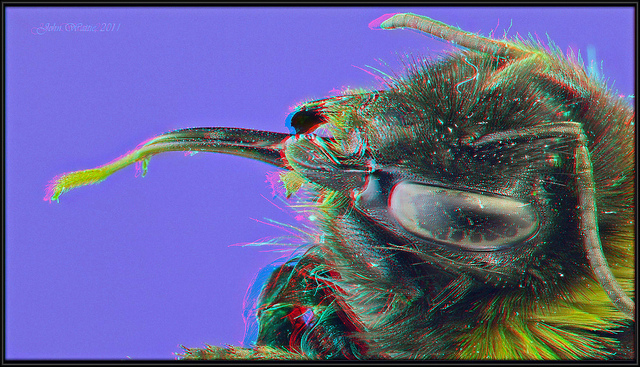
The head of a bumble bee including the "sponge" on the end of its "tongue" (glabra), for soaking up nectar.
The rotating table method, described below, was used to achieve the correct stereo base and retain a wide, 16:9, aspect ratio.
Rotation was 2 degrees, suitable for viewing from 2 meters, or for digital projection.
 CLICK for a larger anaglyph version.
Better still, see a large parallel pair in true colour on a 3D computer.
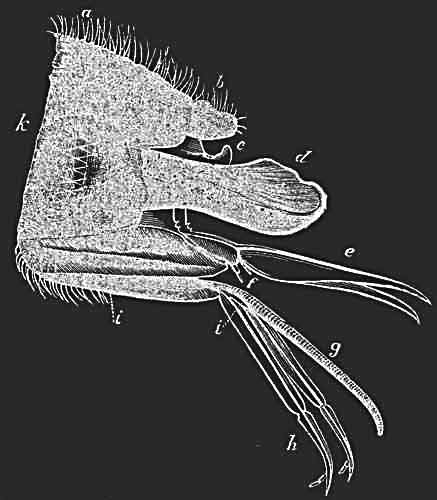
<- Details of the mouthparts: click the diagram for a key.
 Wear red/cyan anaglyph glasses to see in 3D.
All modern cameras can focus close-up, but macrophotography demands more magnification than close-up photography. If a 24mm vertical object is too tall to fit in the camera viewfinder, you are taking a macro photograph. Separating macrophotography from close-up photography by a magnification value may seem arbitrary, but at least 8 factors become important in 3D macrophotography, which are often neglected in close-up photography:
The role of mathematics becomes more significant in macro photography, but many people just play around until the image on the camera live screen or view-finder looks right and ignore the maths. |
The definition of macro photography in the digital age has changed from reproduction ratio in the camera (of more than 1:1), to the total magnification on the final image. According to Wikipedia, (2011), digital macro photography means a total magnification of at least life size on a 150x100mm print (6x4 inch, which is the common post-card size). Defining macro photography as life size on a postcard is much less demanding than the old 35mm film requirement. You can get away with a reproduction ratio, in a 35mm sensor size digital camera, of only 1/4 the old standard. 35mm frame magnification to reach 100mm print height = 100/24 = 4.2 Reproduction ratio [1/4] Digital macro photography definition
This is equivalent to the old film-based definition. It can be simplified to: If you photograph an old 35mm slide and it gets too big to fit on your camera screen, you are moving from close-up photography to macro photography. or, the same thing: If a 24mm vertical object is too tall to fit in the camera viewfinder, you are taking a macro photograph. |
Macro photography is all about getting high magnification in the image.
Reproduction ratioReproduction ratio is magnification in the camera.
Frame magnificationFrame magnification is magnification from the sensor up to the final print (or computer, or projection screen). Frame magnification in film days was done in an enlarger.
Total magnification[Total magnification] equals
Rearranging to find the desired reproduction ratio: Small sensor correction, C.In general, if the conversion factor from digital camera to 35mm full frame sensor is C: So, with a small digital sensor, there is less magnification in the camera and more magnification of the frame to reach the same final magnification on the print. C for a 4/3 digital format (Panasonic, Olympus) is 2. C for a Canon Kiss camera is 1.6
|
With your chosen camera and viewing system, the frame magnification may become a constant which only has to be computed once. CroppingHowever, if you crop the image to a smaller size, frame magnification has to increase to once again to fill the viewing screen or print. Cropping is equivalent to sophisticated digital zoom. When modern cameras with large pixel numbers are used, cropping, combined with increased frame magnification, is a valid method to obtain higher magnification. In fact it is a desirable method, since it improves the depth of field. Computer frame magnificationI no longer bother with prints and see digital photographs on a computer, or projected. Computer monitors come in all sizes, but my favourite is 295mm high. So macro photography on my 295mm screen means a total magnification of: You can easily work out the magnification required for macro photography on your own monitor. Small digital camera sensorsDigital camera sensors can be less than full 35mm size (24 x 36mm). If the sensor is half the size of a full 35mm frame (as it is for the common 4/3 digital format favoured by Olympus and Panasonic) then you need only half the 35mm camera magnification to fill the sensor. But frame magnification from the half size sensor to postcard size has to be twice as much. [4.2 x 2 = 8.4] The 35mm camera equivalent is always quoted when you buy a digital camera. For the 4/3 format, C = 2. That means a 50mm focal length lens on a 4/3 format camera is equvalent to a 50 x C = 50 x 2 = 100mm lens on a 35mm camera. Required reproduction ratio in the camera to get 4.2 magnification on a postcard from a 4/3 digital camera sensor is (equation (2) and (3)): So, when I use an old macro lens from 35mm film days on my Olympus camera, I set the magnification to 0.5 (1:2) to move from close up to macro photography. Advantage of a small sensorThe advantage of a small digital sensor in macro photography is
The disadvantage of a small sensor is more noise. However, the biggest problem faced in macro photography is a small depth of field, followed by a small working distance making it difficult to get the lighting in place and frightening insects. The increased noise is a small price to pay for reducing these problems. BUT focus stacking is a far better way to increase depth of field and reduce diffraction blur, at the price of much greatercomplexity, and a rise in noise. So if you prefer a big sensor for high magnification, low noise stereo, you had better learn focus stacking. And if you want to understand all this, you had better keep reading on! |
Supplementary lens ("diopter")Extra magnification comes from using a smaller focal length. A cheap way to drop the focal length (F) is to add a magnifying glass in front of the macro lens. Such lenses are sold as supplementary lenses, sometimes called "diopters" on the internet but that seems a funny name to me It is better to use an achromatic lens (no colour aberration, achieved by using at least two different glasses in assembly). Achromatic lenses are easy to obtain now that film cameras are obsolete. Get hold of an old but high quality achromat from a discarded camera. Currently I am experimenting with a Mamiya medium format lens screwed off the main lens, so the diaphragm is no longer in the system. The focal length of this combination of achromatic surplus glass and macro lens has to be measured. See the next column for how I do this. |
Computing the focal length of a macro lens plus a supplementary lensVarious formulae are available for computing the effective focal length of a combination of lenses, and need various corrections. I favour measuring the focal length under the conditions of macro photography, by-passing complex corrections. I do this by measuring the magnification power of the lens combination.
Total magnification onto the computer screen is: M2 = A / a Frame magnification, M1, in 35mm terms is: M1 = H / 24 Reproduction ratio in the camera in 35mm equivalents is: R = M2 / M1 = 24 A / H a
The focal length of your lens combination in 35mm equivalents, F, is: F = E / R F = H a E / 24 A |
Magnification and stereo baseThe simple pin-hole camera formula for stereo base, with infinity in the picture: B = n P / F can be simplified, once the magnification is known, M = F / n to: B = P / M B = Stereo base For a reproduction ratio of 1:1, B = 1.2mm. |
 |
But infinity is not included with a close-up photographOh dear, I thought the above formula was improbably simple! Including infinity in close-up stereo photography is too much of an eye-strain. Usually the maximum distance (m) is less than twice the closest distance (n) for a satisfactory macroscopic 3D picture, which the general population can view. B = P / (Mn - Mm)(a) B = stereo base Mn = Magnification at nearest distance (n) where: Mn = ( F + E ) / n (b) Mm = Magnification at maximum distance (m) where: Mm = ( F + E ) / m(c)
|
Combining equations a, b, c: B = P / ( ( F + E ) * ( 1 / m - 1 / n ) ) |
B = P mn / (m-n) ( 1/F - ( m+n ) / 2mn ) The Bercovitz formula comes into its own in macroscopic 3D. The simple "pin-hole" formulae do not allow for lenses which focus close by moving away from the sensor. Pin-hole formulae work pretty well for objects further away, where the focus movement is rather small compared with the lens focal length. The formula requires you to measure the distance from the lens first nodal point to the nearest object (n) and to the furthest object (m). That might be pretty easy. But where is the first nodal point, especially if the lens is focusing internally? Pin hole formula for stereo base gives same answer as BercovitzModification of the pin-hole formula to include magnification matches the Bercovitz formula. R = 1:r + E / F R is magnification in the camera, or Reproduction Ratio. n = F ( 1 + 1 / R) The magnification formula means the step in the Bercovitz formula where the extension is computed can be left out, because extension is being measured directly and the sometimes difficult to measure nearest distance (n) is being computed instead. The formula which does that is given later. |
All this figuring is rapidly done on a spreadsheet. Make your own or wait for mine to reach the web!
How do you measure R (reproduction ratio) in a simple way?
(35mm equivalent Reproduction Ratio) = (measured height) / 24 The viewfinder height may be slightly smaller than the true frame height. Try not to get obsessive about that! There are a couple of corrections to apply to this.True reproduction ratioThe true magnification is needed if you are using a macro lens with 35mm reproduction ratios marked on it. True reproduction ratio = (35mm equivalent) / C C = 35mm conversion factor. (2 for 4.3 format digital cameras, ...etc)
Cropping factor
That means the 35mm equivalent frame actually used is less than 24mm. So in calculating the in camera magnification (reproduction ratio) you have to allow for a smaller frame size. Say, 20mm, but experience with your rig teaches you how much needs to be cut off to get the correct final magnification factor. Starting with the object sizeTrial and error by screwing the extension tubes is a pain (it is a lot easier with bellows). So, measure how tall your subject is. I use a plastic dial micrometer. Add on the additional frame height required for the cropping factor. R = object height + cropping margin Then you can compute the extension tube length to fit your subject without a lot of messing about by trial and error. E = R F / C E = length of extension tubes required |
Magnification with extension tubesHigher levels of magnification require winding the lens out until it focuses close, but only dedicated macro lenses will get you up to 1:1 magnification in 35mm equivalent terms. More magnification requires supplementary lenses (diopters) in front of the lens or, my favourite method, extension tubes.
E = the length of the extension tubes between the camera and the lens, e = extra extension gained by winding the lens focus out beyond the infinity position. F = focal length of the lens R = reproduction ratio (magnification in the camera) R = ( E + e ) / F -----(4) More extension and/or a smaller focal length increases the magnification. The first decision is how much magnification you want in the camera (R).Now arrange the required lens focal length (F) and the extension (E) to reach this magnification, using equation (4). OR just mess about changing the extension tubes and winding the lens focus ring until magnification looks right on the camera view-finder. This non mathematical method is easier with a bellows than with extension tubes. ExampleThe extra magnification from winding out the lens is not always so easy to measure. Some macro lenses wind the lens out both in front of the focus ring and behind it. My favourite lens:
|
Focusing with extension tubesFocusing a camera in the close-up range is simply done by turning the focusing ring, or using auto-focus, just the same as ordinary photography. Focusing in the macro range is not done that way. An extension tube set has several lengths, which can be coupled together for various magnifications, or you can combine two sets of tubes for even more magnification. Alternatively, use a macro bellows system, which usually includes a focusing stage. At high magnification, the lens focus ring (or a variable bellows extension) no longer works as a useful focusing system. Winding out the lens or increasing the extension increases the magnification, but makes only slight difference to the focus. Focusing stageFocusing at high magnification is done by moving the whole system:
This works well in the studio, or on the forest floor, but is not so easy for insect photography in the field. Hand held focusingThere is a limit to how much focusing you can do hand-held, but experts manage it, especially when using flash (which fires so fast it overcomes camera-shake). It is even possible to arrange focus stacking hand-held:
|
Parallel optical axis:
|
With parallel cameras, the diagram shows that at 1:1 reproduction ratio (magnification of 1 in the camera), the image width which has to be cut off to make the final stereo window is the same as the stereo base. As magnification increases further, the final image width drops even more.
For a full width stereo image you need to toe in the cameras and correct for keystone distortion during post-processing.
|
wear red/cyan anaglyph goggles to see in 3D
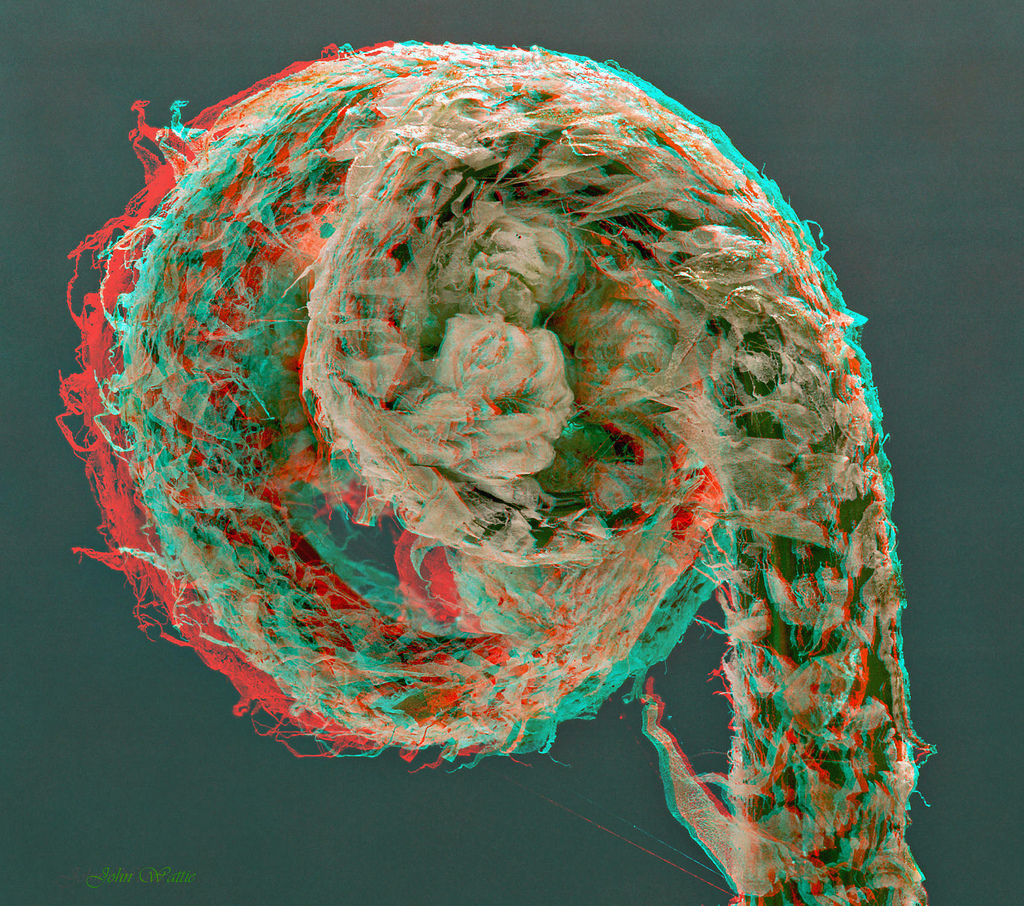
Fern frond opening (Koru)
Square aspect ratio
Image stack processed in Zerene Stacker
stereo macro-photography by John Wattie
The large version may be too big for your screen, but it gives you the chance to pan around a magnified image, in stereo.
Large 3D images are much like using a low power stereoscopic microscope.
But taken with a camera, side ways shift, focus stacking, extension tubes and a macro lens, not a microscope.
In close-up photography, a square picture is acceptable, a portrait format is useful for orchids and mushrooms, but a thin vertical image is not always so good. |
The only way to get a macro, stereo image to fit a letterbox shaped computer screen is to toe in the cameras. |

Small Flower macro image in letterbox format
toed in camera axes by 3.7 degrees,
image stack (27 images for each eye)
preferred viewing distance 1 meter.
Because any size screen could be used to view macro images on the internet, it can be helpful to include a scale.
Computing the magnification might be troublesome, using the method described above.
It is practical to photograph a ruler with the macro rig used and transfer the scale to the image in Photoshop,
avoiding all computations { :-).On my 22 inch monitor, the magnification is 35 times. Enough to see pollen grains.
Macro stereo photography: Page 2: ROTATION